What is headroom anyway?
The final process after mixing, before production is complete, is mastering, where we use dynamics processors, equalizers, and sometimes effects to achieve uniformity in our tracks. Mastering is especially important when you want to release a whole CD, so that the tracks sound consistent with each other.
These effects can usually influence the dynamic range of our mix, i.e. they increase the perceived loudness. In order to be able to work reasonably with these effects, we therefore need a "margin". This "margin" is called headroom, and it is the distance between the largest peak (excursion) of the song and the clipping limit.
Keep reading: All about dithering in the digital audio world
Headroom in the analogue audio world
Technically, headroom (measured in decibels) is the ratio between the maximum undistorted signal a system can handle and the average level for which the system is designed.
For example, let's say you have a recording system with a nominal average level of -10 dB. If you can pump a signal of +7 dB undistorted through your system, you have a headroom of 17 dB.
Undistorted is the key word here. If you run out of headroom, distortion will occur. However, that can be a good thing - if you run out of headroom in an Orange amp, because then you get nice, desirable distortion. But for studio monitors or a mixer, it's not a good thing.
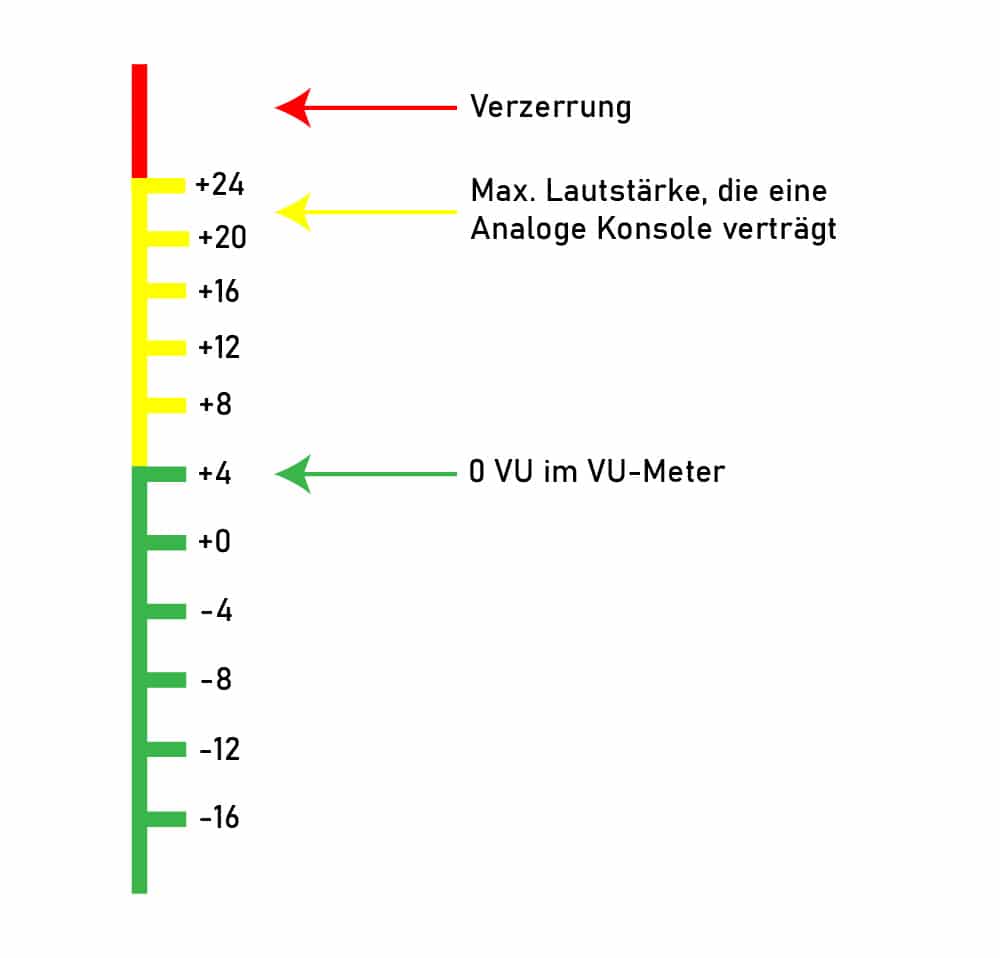
On an analogue mixer designed for an average signal level of +4 dB, the VU indicators are calibrated to show 0 VU at +4 dB. However, a professional mixer designed for +4 dB can provide an output level of +24 dB.
So at 0 VU you have a margin of 20 dB (24 - 4 = 20) to ensure that unforeseen level increases - like a singer being too loud - or strong transients are reproduced correctly.
Other important terms that play an important role in the calculation of headroom:
- Signal-to-noise ratio: A measure that describes the performance of an audio system in terms of noise, signal quality, and fidelity. It is calculated by comparing the volume of the audio signal with the noise floor of the system (a system can be a mixing console, a DAW, a guitar amp...).
- Noise floor (background noise): The noise floor of a device or system is the noise generated by the device itself when no signal is present. It is measured in decibels. All electronic devices generate some amount of noise, even a piece of wire! Minimising the noise floor results in an extended dynamic range and a lower signal-to-noise ratio. This leads to cleaner and undistorted recordings or music productions.
Headroom in the digital audio world
Now it's getting tricky!
First of all, 0 dBFS (FS stands for "Full Scale") in a digital system means the absolute maximum level that the system can handle. In contrast to analogue systems, which have an "invisible" headroom above 0 VU, 0 dBFS is the maximum that can be achieved.
For this reason, many music producers calibrate their recording systems (DAWs) to -18 dB below 0 dBFS, as this creates headroom that a digital system does not inherently have.
But: If you record with -18 instead of 0, you lose about 3 bits of resolution (each bit corresponds to about 6 dB). But if you record with a bit depth of 24 bits, you only have 21 bits, which is still more than the actual resolution of most hardware (a 24-bit converter doesn't have true 24-bit resolution due to inaccuracies in the converter itself, noise, board layout, etc.). You also have more headroom to compensate for peaks, resonances, and sudden spikes.
But that's not the only point where headroom comes into play with digital systems. Headroom refers to dynamic range - once signals enter the computer, today's DAWs have audio engines with a virtually unlimited dynamic range.
It is almost impossible to exceed the headroom of the audio engine. Therefore, individual mixing channels can go "into the red zone" without causing distortion.
But the audio signal has to get out of the DAW at some point and return to the analogue world, via D/A converters (digital-to-analogue converters) and hardware. And these have a limited dynamic range.
It has proven effective to set the master fader to 0 and use the channel faders to find the best balance, instead of letting the channel faders run "hot" and lowering the master fader to compensate.
If you keep the master fader at 0, thanks to the high resolution of your DAW's audio engine, it is no disadvantage if the levels of the individual channels on the faders are at -18.
Headroom, PA systems and mixers
With a sound system or analogue mixer, you should use the maximum available headroom to minimise noise. To achieve the best gain, you should raise the level as high as possible at the input (preamp).
For microphones, select the proper gain on the mic preamp, for line level devices, such as electronic instruments, adjust the output of the instrument to reach the maximum level without distortion, and then adjust the gain of the mixer accordingly.
What about the headroom of amps and speakers?
Now things get more interesting. First of all, the gain control on a guitar amp does not control power. The amp can run at full gain all the time (the monitor speakers in your studio probably work the same way). The input knob controls the level that goes into the amp.
This is good because you have full headroom all the time and your transients come through. But this also means that you have to be careful not to turn up the input level so far that the headroom is no longer sufficient.
Speakers don't have the same headroom as power amplifiers, but if you put too much signal into them, it can cause distortion or even speaker burst. Because modern powered speakers contain both the speaker drivers and the amplifiers that drive them, they have protections (limiters) to limit the audio level and protect the speakers.
Passive speakers and separate power amplifiers are more likely to cause problems with this type of setup - the speakers and the power amplifiers do not "talk" to each other. If there is distortion in the power amplifier that causes clipping, the average level of the signal is raised, resulting in more power at the higher frequencies and therefore more likely to cause a tweeter to fail.
How do I get good headroom?
If you don't leave enough headroom in the DAW, you really need to think about where you want to go with your mix. You're going to hit the proverbial (and literal) ceiling early and often. In the analogue world we had some headroom at the top end of the level meter, but in the digital world that's not the case.
The solution? Free up as much headroom as possible and your mix will be livelier and have more room to breathe. Here are the easiest ways to give your mix back some precious headroom.
Turn down your tracks
This is the simplest solution to the headroom problem. But few seem to follow this advice. If you simply turn down your tracks in your DAW, you send less signal to the mix bus and immediately get more headroom and clarity. If you consider this from the beginning, there should be no more surprises.
I guarantee your mixes will finish faster and sound better if you simply turn down all tracks before mixing. With the modern 24-bit depth that almost all audio interfaces offer these days, you have a very low noise floor. There is no need for really loud tracks to drive up the level meter. If you reduce the level and turn up the speakers, your tracks will sound better.
Hold a look at the metering plug-in on the master track
Normally, the point at which overload occurs in a DAW is at 0dBFS. That's why it's best to keep the overall mix at about -6dBFS. So when you start mixing, the drums should first be at -9dBFS (assuming you start mixing with the drums). Since the bass, piano, guitar, voice and other instruments will come in later, the overall mix will probably end up at around -6dBLFS.
Use your high pass filter often
This is a very simple but effective solution. By cutting the ultra-low frequencies (100 Hz and below) on almost all instruments except the kick drum and bass, you free up a lot of headroom and volume to allow your mix bus to breathe. For most tracks in the mix, the range below 100 Hz has no sonic benefit, so it's a waste of volume anyway.
Work in 24-bit for more headroom
In the past, when there were no digital recording systems, it was very important to record as loud and clear as possible to have the best possible signal-to-noise ratio. Even with cassettes it was important in the 90s, because they were based on 16-bit. But with 24-bit it is no longer necessary. The noise floor of 24-bit systems is so low that you can leave a lot of space between peak and 0dBFS without noise problems. Even with later compression, there is still no unwanted noise.
Headroom in mastering: Why is it important?
You could even send a track mixed at -2 dBFS to a mastering engineer and he would still be happy as long as there was no overload. Because it really only comes down to 2 important points:
- Do not allow levels at 0 dBFS
- Do not use a peak limiter or similar plug-ins that prevent natural levels that would otherwise reach 0 dBFS or clip them by creating a hard limit (brickwall limiting) at or below 0 dBFS.
Because yes, a mastering engineer can turn down a loud, unmastered mix to a level they can work with, but they can't undo the damage done by peak limiting or clipping, which is why it's so important to pay attention to these two steps.
As soon as you use a limiter in the mix bus, the "damage" is done and cannot be undone. This also means that any additional analogue or digital processing will only make the sound worse or at best slightly better.

