What are room acoustics?
Everyone immediately associates listening to music in the best quality with good and expensive speakers, which is why studio monitors are usually one of the first purchases people make when they start producing music. And that's a good thing!
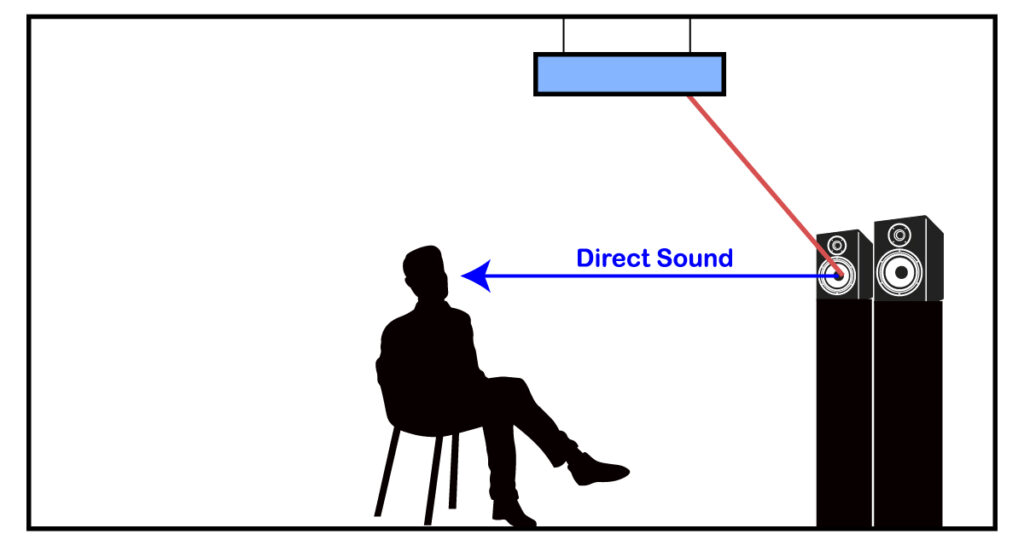
At least as important, however, is room acoustics, meaning how the speakers actually sound in the room. This is because the sound waves that come out of the speaker primarily hit your ear (Direct sound), but there are also sound waves that first hit a wall and then hit your ear (early reflections). And there are even sound waves that are first reflected back and forth a few times on walls before they reach your ear (late reflections).
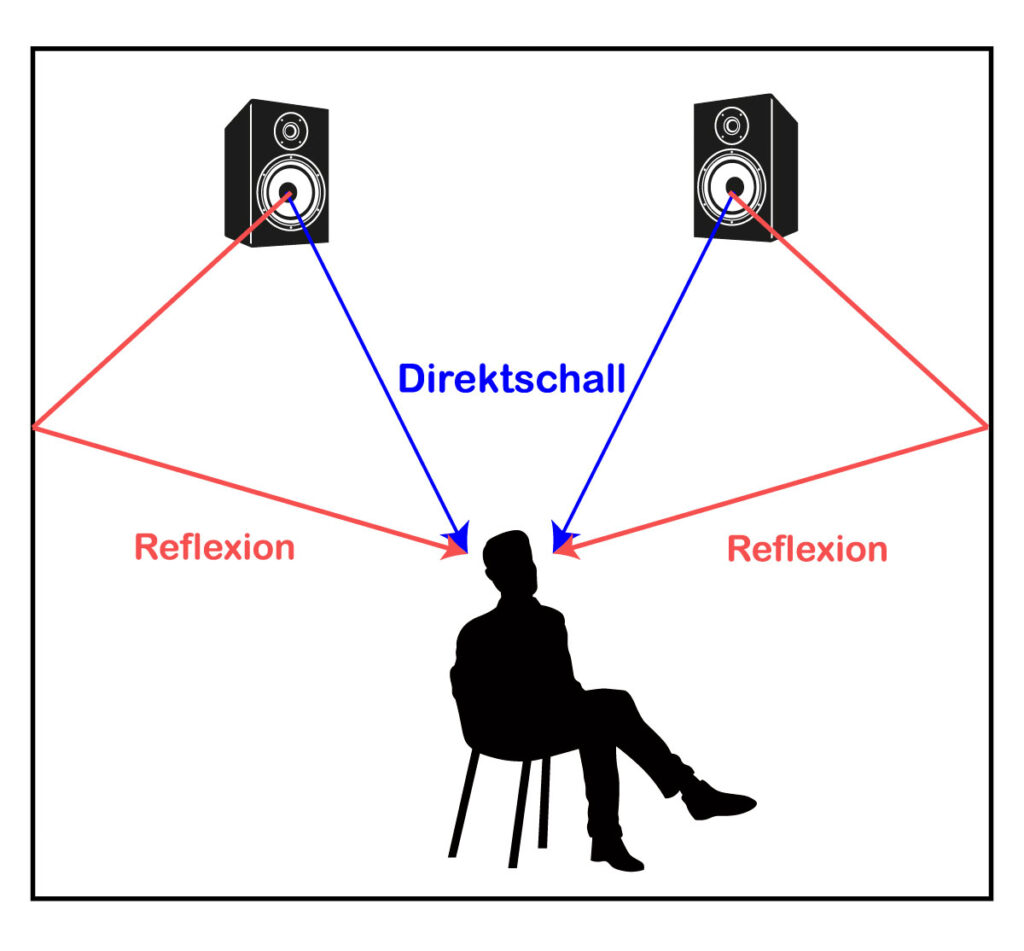
So the sound wave hits your ear at least twice, once as a direct sound and once as an early reflection that is out of phase, because it has to travel a longer distance before it reaches your ear. What happens then? Then there is interference due to the phase shift, and the audio signal becomes weaker or stronger at certain frequencies.
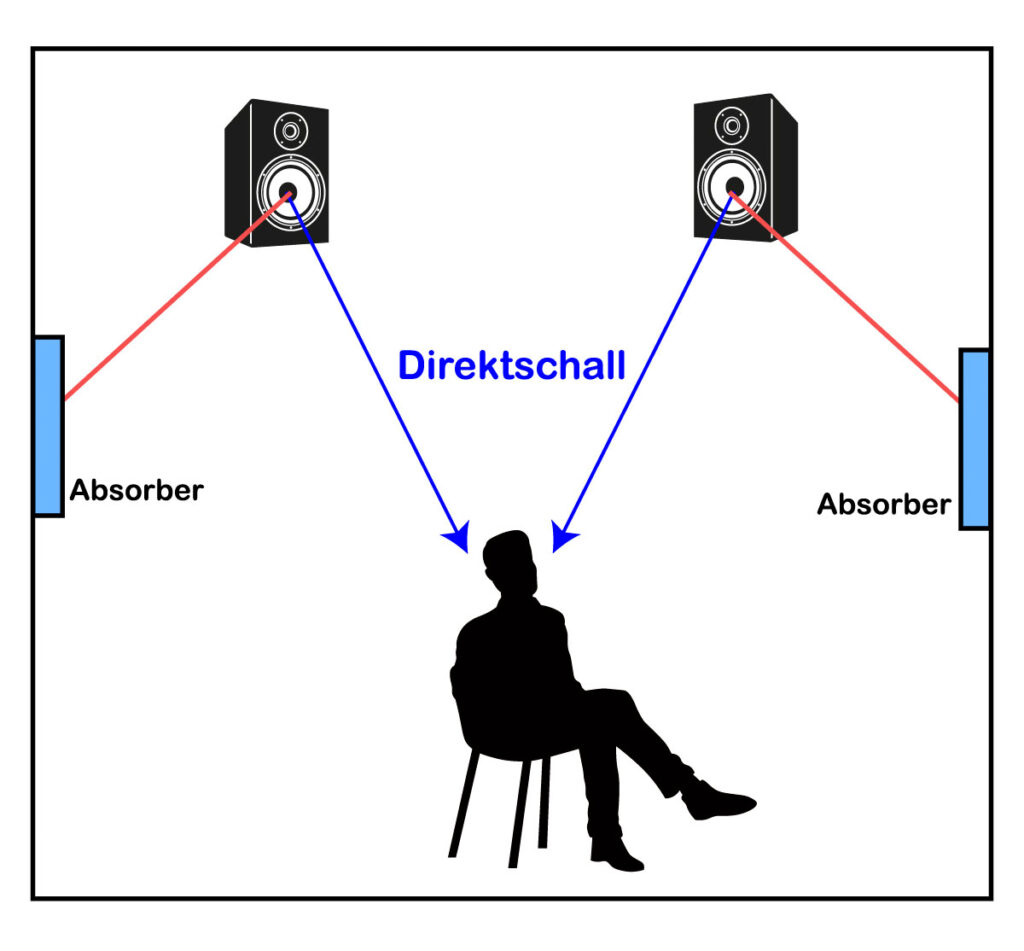
There is a very simple and not necessarily expensive solution for this: improving the room acoustics. By installing absorbers, reflections are eliminated so that the sound can be heard as clear as possible in order to make the right decisions during production. The goal is to eliminate as many reflections as possible so that you hear only the direct sound coming from the speakers.
With relatively few resources, you can improve the acoustics of a room-significantly. But you have to know what you are doing to be effective and spend as little money as possible.
Why are room acoustics so important?
The first thing to understand is that room acoustics are only important for recording, mixing and mastering. If you're just producing beats for someone else to mix, you don't really need to worry about acoustics. But it's a lot more fun to listen to music in an acoustically optimized room - I can only recommend that anyone who spends a lot of time in front of speakers improve their room acoustics.
Improving room acoustics for mixing and mastering
Good room acoustics are important for mixing and mastering in order to work effectively and make the right decisions. If the room has acoustic problems, certain frequency ranges will be weaker or more emphasized than they actually are. As a result, these frequencies will be compensated for during mixing or mastering, resulting in the final mix being too soft or too loud.
Classic example: A room has acoustic foam in the walls, but no bass straps. This means that only the high frequencies are absorbed, and the low frequencies are reflected uncontrollably in all directions of the room. This usually results in the low frequencies sounding too loud at the listening position.
My mixes in this room will always sound too weak in the bass range on other systems because I have unconsciously compensated for the bass boost caused by the room acoustics during mixing.
Improving room acoustics for recordings
When recording, the acoustics of the room are especially important so that the sound can be picked up by the microphone without any interference. Again, if the room is not acoustically treated, the sound waves from our instrument or voice will be reflected off the walls and into the microphone, causing interference, phase cancellation, and so on. And that is irreparable when the recording.
On top of that, the audio source sounds very roomy and not dry, which is exactly what you don't want to hear. We've all been there: you record your voice for the first time with a condenser microphone (usually a Rode NT1A) in a room that's not acoustically treated, and you're surprised at how strange it sounds, almost like you're in the bathroom.
Identifying problems in the room acoustics
The scientific method for finding the exact problems in a room is to use a measurement microphone and software. This can be used to measure exactly which frequencies are emphasized too much or too little. But there are also "unscientific" ways to quickly identify problem areas.
Problems in the bass range
Low frequencies are often the most problematic part of a room. This is because bass waves are very long (large) and carry a lot of energy - so much that they can penetrate walls and buildings. Think about the neighbor two doors down who is having a party with loud music all night. What you always hear from a distance are the very low frequencies, the "boom, boom, boom".
Another problem is that deep waves are omnidirectional, meaning they propagate in all directions. So they reflect everywhere, which causes massive problems.
An easy way to determine if you have bass problems is to play music through your studio monitors and move from one corner of the room to the other. You will notice that the bass is especially loud in the corners, which means that the room acoustics can be improved.
Direct reflection and reverberation time
Direct reflections come from the side walls, ceiling and floor or table. They cause phase shifts, cancellations, and accentuations in the frequency ranges and generally make the sound more spatial and difficult to locate. They cause a natural reverberation of the room.
You can tell if there are a lot of reflections and reverberation by clapping your hands or singing a short "ah". If the sound still reverberates in the room, it is reflections.
Improve room acoustics with absorbers
Our main helpers against unwanted reflections are absorbers. These are structures made of certain materials that absorb sound waves rather than reflecting them like a normal wall.
These materials are porous and have the ability to convert sound energy into heat energy - "swallowing" the sound waves. There are several materials that are commonly used in recording studios to improve room acoustics:
- Rock wool
- Glass wool
- Basotect
- Hemp
- Caruso Iso Bond
- Sheep's wool
They differ in length-specific flow resistance, an important value that describes how much the speed of the wave is reduced as it passes through a given length of material. And, of course, price, which is an important consideration when building large studios. After all, absorbers only work if they are used in sufficient quantities.
In this guide I will use rockwool for all absorbers and bass traps. The reason is simple:
The low frequency waves are very large and must penetrate deep into the absorber to be absorbed, so you need low flow resistance and a large thickness. If the flow resistance is high, the low frequency waves will eventually not penetrate and will be reflected. This is exactly why rock wool is very suitable, because it has exactly this property. It is also cheap, which is important because you need a lot to make the absorbers thick enough.
Waves in the higher frequency range will still be absorbed, resulting in a balanced sound. If, on the other hand, only materials with high flow resistance but low thickness are used, such as acoustic foam or Basotect, only the high frequencies in the room are absorbed, but not the low frequencies, and the sound becomes unpleasantly dull.
And rock wool is available in every hardware store in the world because it is also used to insulate buildings.
Dead End and Live End
Professional recording studios use the "dead end, live end" concept in the monitoring room. This means that either the front or the back side of the room is kept "dead", i.e., only with absorbers, so that nothing is reflected there. And the corresponding other side should be kept "live", i.e. with diffusers that reflect the sound in as many ways as possible. The reason for this is that the complete absence of sound reflections is unpleasant to listen to.
But the thing is that most producers work in rather small rooms where there are already furniture, objects or instruments in the room, so the sound is already reflected a little bit in all directions. So I wouldn't worry too much about that - we'll try to improve the room acoustics by absorbing as much sound as possible.
Improving room acoustics: This is how it works
1. Set speaker position + seat position
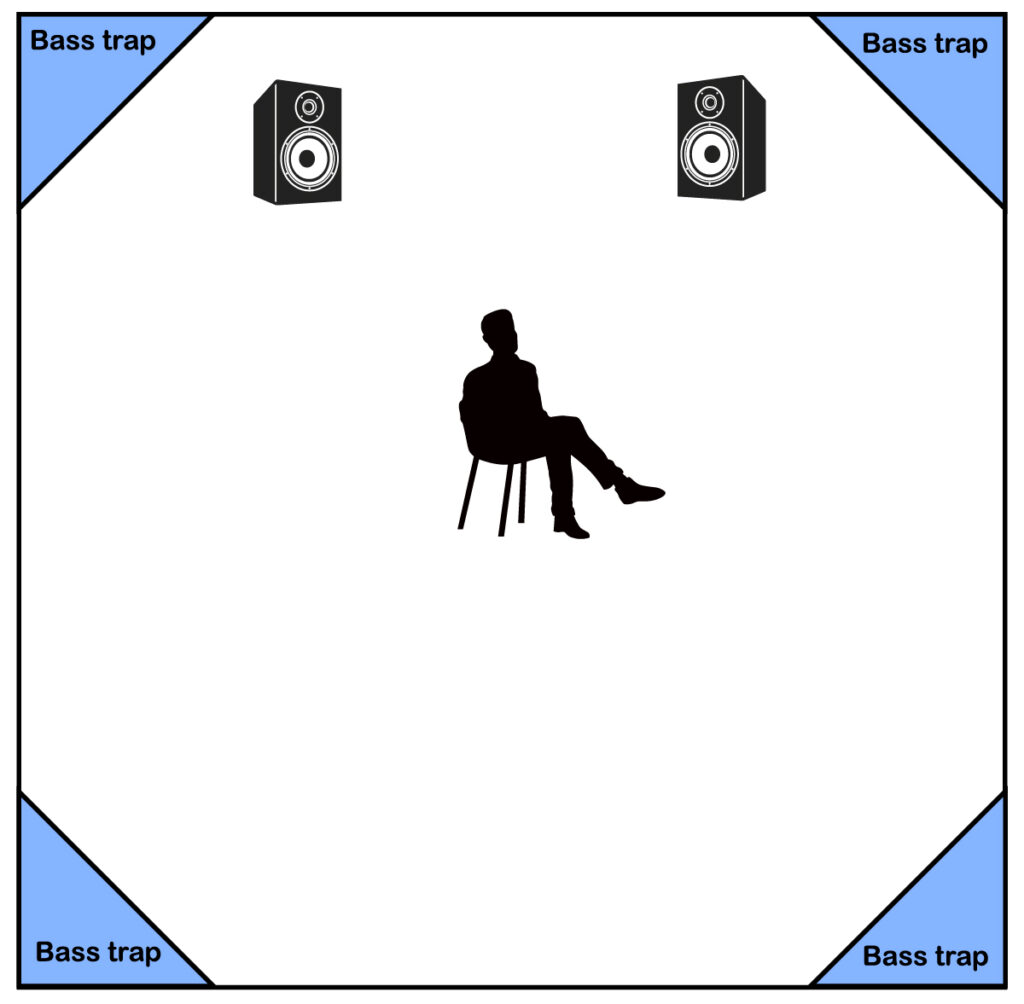
First, determine your listening position. The speakers are placed in an equilateral triangle around this listening position, preferably as far away from the wall as possible. For many producers, including myself, this is practically impossible because there would be no room left.
So you can put them close to the wall if you put enough absorbers around them. The best studios build the speakers directly into the wall (or into the absorber) - this is also best, but extremely expensive.

There is a rule among acoustic experts that you should sit at 38% of the length of the room. If that is not possible, there is nothing wrong with that, but you should try not to sit at 25% or 50% of the length of the room, because the sound is particularly problematic there because of the room modes.
If the room is rectangular, the long sides of the room should be left and right. If the room is square, it does not matter.
2. Measure the acoustic values of the room
The next step is to measure the room acoustics using a program and a measurement microphone. Popular measurement microphones include the Behringer ECM-8000, beyerdynamic MM1 or Sonarworks SoundID Reference Measurement Microphone.
This way, you can see exactly what problems the room has at what frequencies and, most importantly, compare the condition after the room's acoustics have been improved. But you will also hear this with your own ears, believe me.
You don't necessarily have to try to get a 100% perfect curve - that's very difficult at very low frequencies without losing a lot of space in the room. But our goal is to improve the room acoustics as much as possible until you can work well and listen analytically without problems.
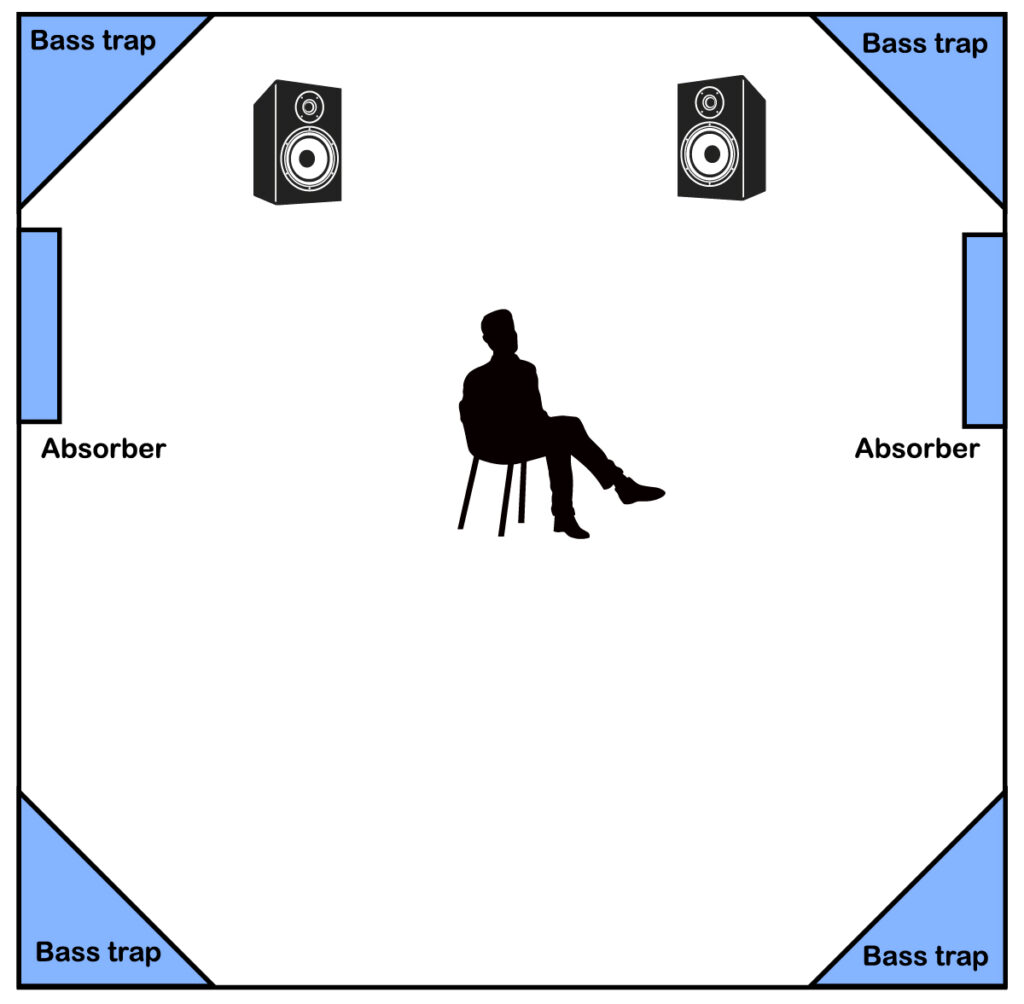
3. Bass traps
Let's start with the most important of all absorbers, bass traps. They are placed in the corners of the room to absorb mainly the bass frequencies. These frequencies are especially amplified in the corners of the room.
The bass traps are very large and made of porous material to allow the deep waves to penetrate well. As a rule of thumb, 1/4 of half the wavelength (i.e. 1/8 of the total wavelength) of the absorber thickness is needed to absorb the wave. As an example: A 100 Hz sound wave is 3.43 m long. Therefore, you need 40 cm of absorber depth to absorb this wave.
This is why the bass straps have to be so large and massive. However, because they are placed in the corners, they take up less space.
There are 2 options: You can build the bass straps yourself, which takes some time but saves a lot of money (the bigger the room and the more bass straps you need, the more you save by building them yourself), or you can buy ready-made bass straps.
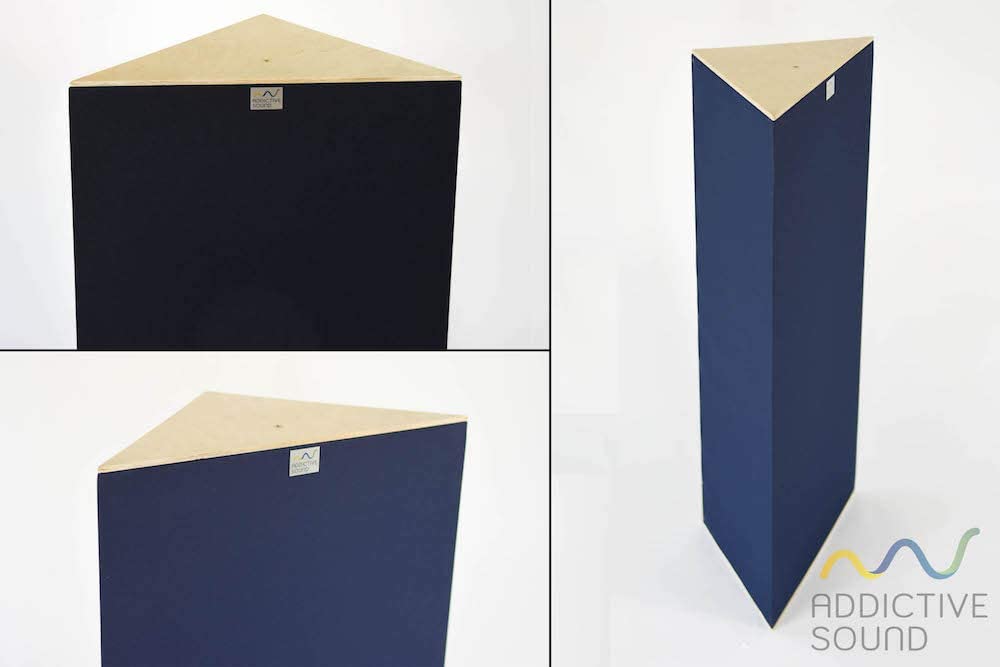
I wouldn't recommend foam bass traps, but ones filled with slightly more porous absorption material. I personally have the Addictive Sound bass traps in my home studio and am very happy with them, so I can recommend them to anyone. They are large, relatively inexpensive, very nicely built and work extremely well down to the lower frequencies. They also stack very well and come in 11 different colors.
Otherwise, I can also recommend the following bass traps:
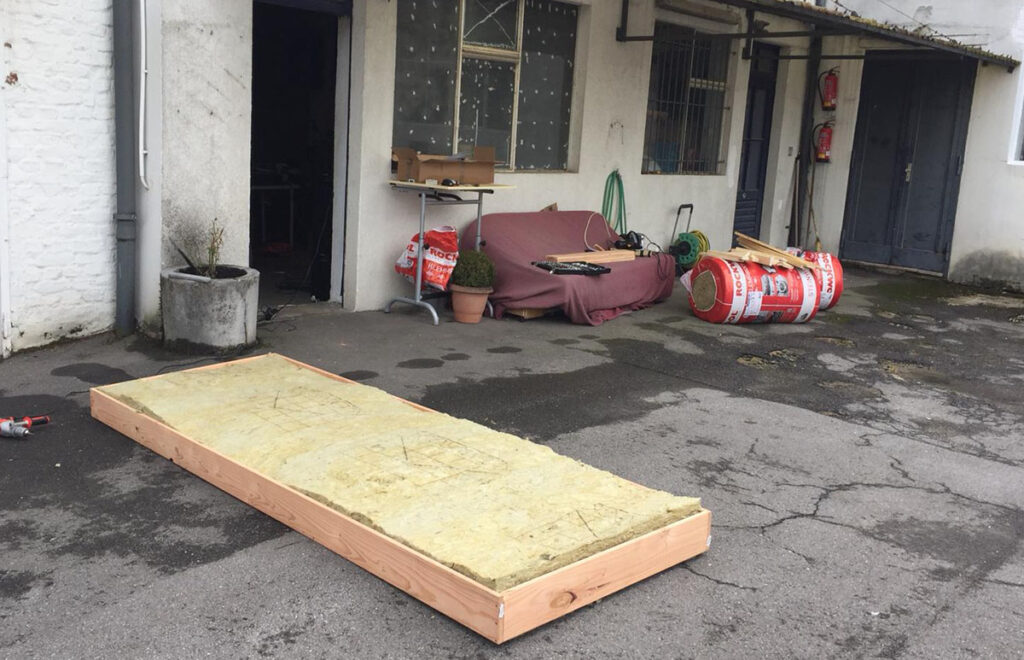
For my recording studio, I built the bass traps myself, because otherwise I would have spent a fortune on them. To do this, I bought Rockwool from Obi, cut triangles out of it and stacked them on top of each other. Then I built a wooden frame around it and stapled fabric to it.

By loading the video, you accept YouTube's privacy policy.
Learn more
You can save a lot of money by making your own bass traps, and there are no bass traps on the market that are this big. You'll have to invest some time - especially if you're not a carpenter - but it's worth it. You will also need tools, especially a circular saw to cut the wood and an insulation knife to cut the rockwool.
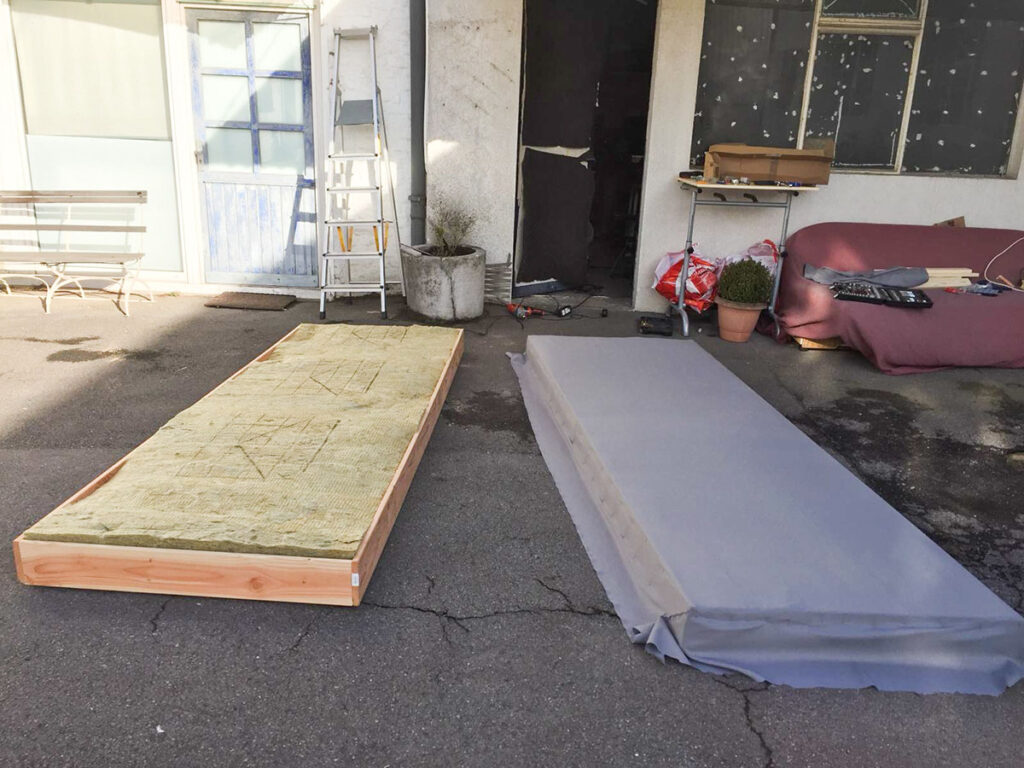
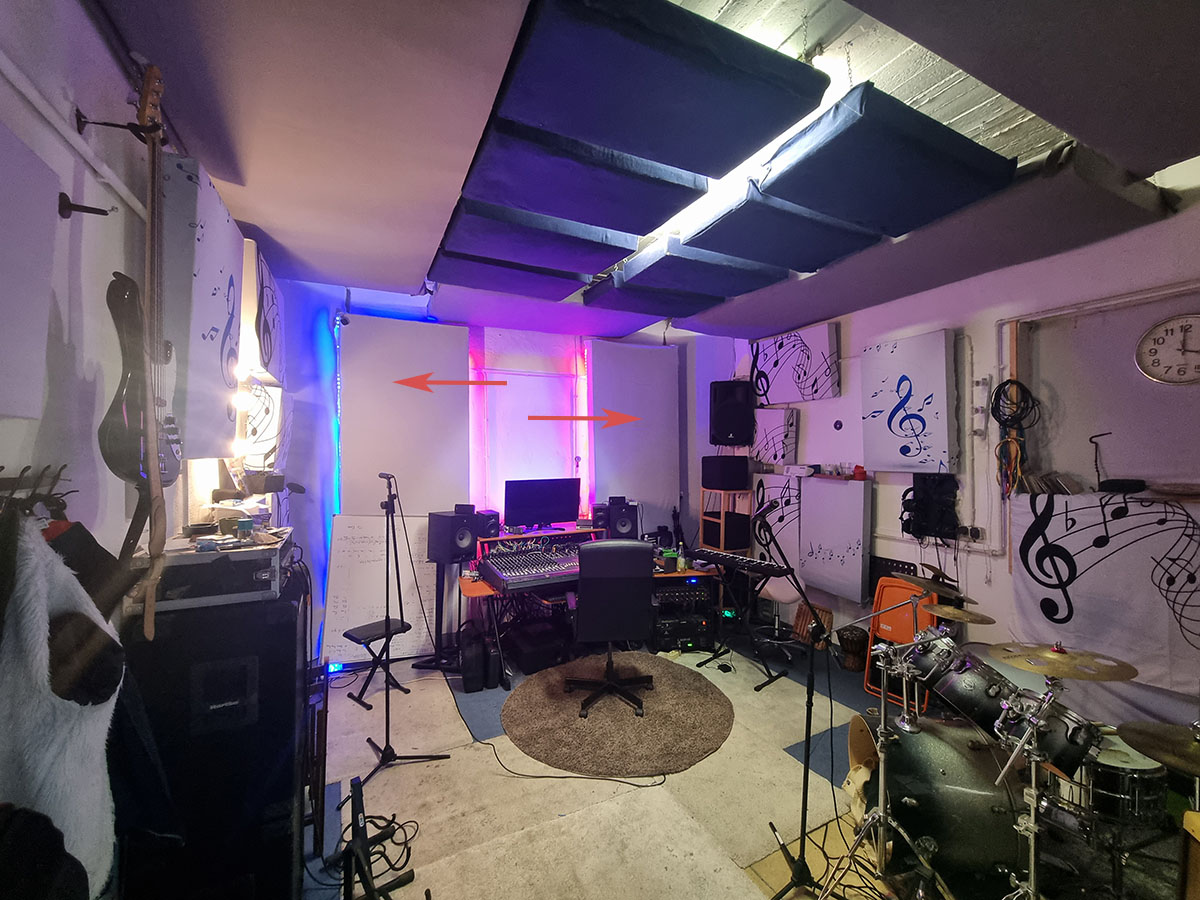
And this is what it looks like in my studio:

4. Lateral absorbers for first reflections
The next thing we need to take care of is the sides, i.e. the left and right walls as seen from the listening position. Here the sound is reflected from the speakers and reaches the ear along with the direct sound, causing phase and interference problems. Certain frequencies will be amplified or attenuated, and standing waves may even occur.
Therefore, at least one absorber must be placed on each of these walls, exactly in the middle between the listening position and the speakers, to absorb the sound waves.
A good trick to find the exact center is to have a colleague place a small mirror on the wall and move it until you can see the cone of the speaker from the listening position - this is the exact center. The absorber must be centered exactly around this point.
Again, thickness and porosity are very important: thin and solid materials can absorb high frequencies well, but not low frequencies. Therefore, foam should be avoided, as it absorbs only the high frequencies and makes the room sound dull.

Again, it is recommended to buy or build absorbers with insulating materials such as rock wool or glass wool. My recommendations if you want to buy some:
It is not difficult to build standard absorbers yourself, and if you have already purchased the tools and rockwool for the bass traps, this is a good option. Again, you save a lot of money by investing your own time.
A simple wooden frame is built, filled with rock or glass wool and covered with a nice cloth. The following video explains the process very well:
By loading the video, you accept YouTube's privacy policy.
Learn more
How many absorbers are installed depends on the budget, of course, but in general the more the better. If you could cover the wall with absorbers from top to bottom over a width of one meter, that would be optimal. But even one absorber on each side makes an audible difference. So if you don't have a lot of money, start with one absorber on each side and buy or build more later.
In addition, the absorbers should not be mounted directly on the wall, but an air gap (3-10 cm) should be left between the absorber and the wall, as this increases the efficiency and the absorber absorbs deeper sound waves. The air gap acts like a small room where sound waves are reflected back and forth between the absorber and the wall. This gives the sound waves more opportunities to be absorbed by the absorber.
5. Ceiling absorbers for reflections
The same applies to the ceiling as it does to the walls - here, too, the sound is reflected and reaches the ears along with the direct sound. Again, we need to absorb as much as possible.

The good news is that the same absorbers used for the wall can be used for the ceiling. In fact, the absorbers can be a little thicker, since the space in the ceiling is rarely needed. However, the construction method is the same as for the wall absorbers.
First, the area between the listening position and the speakers should be covered, and then as much space as possible around the speakers. Again, the more ceiling space you can cover with absorbers, the better.
In my studio the whole ceiling is covered with absorbers:

Ceiling absorbers can be easily secured with chains by placing hooks on the ceiling and in each corner of the absorber. For large and heavy absorbers as in the picture above (the gray absorbers are 1 m x 2.5 m), at least 8 chains should be used to ensure that the absorber hangs securely, otherwise it can be very dangerous.
6. Rear wall
On the rear wall, bass traps should already be placed in each corner. Again, the more area you can cover with absorbers, the better. However, the area directly opposite each speaker should be covered first.
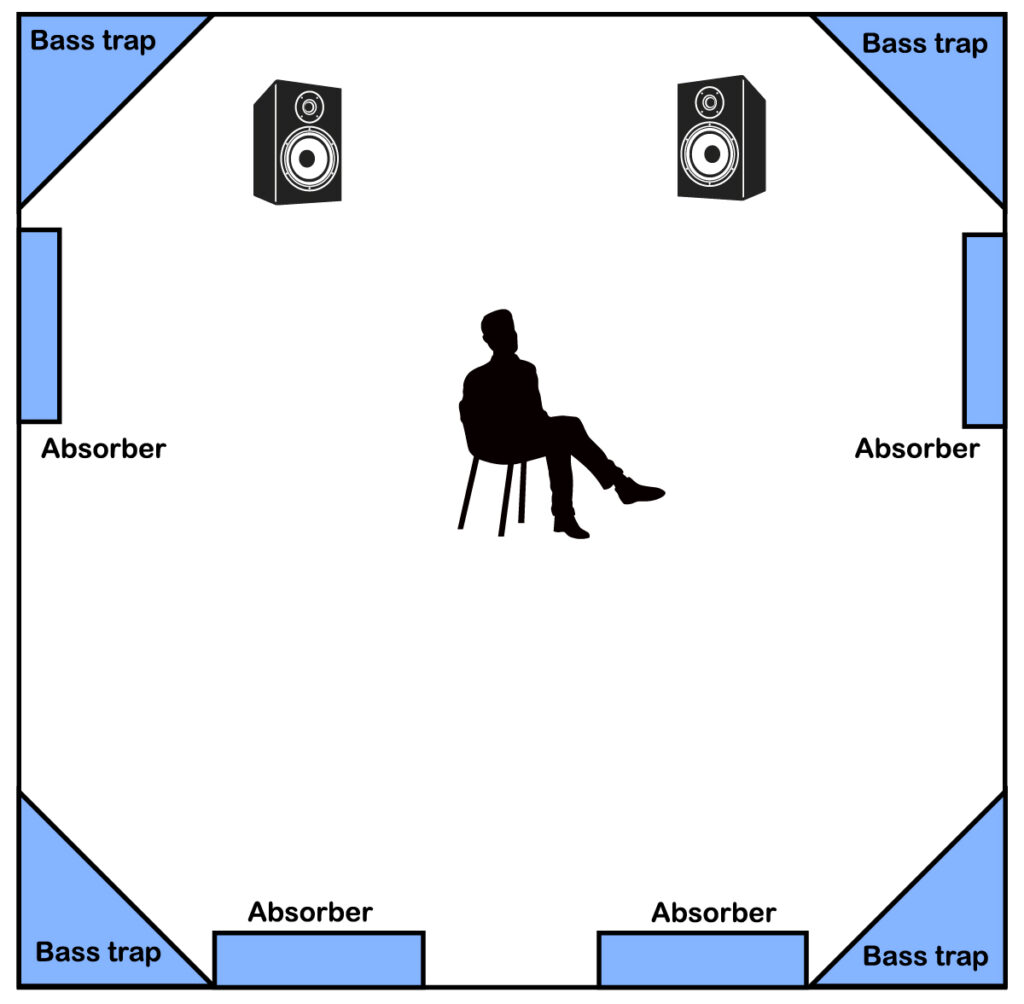
The rear wall is especially good for very thick absorbers. Even if you lose a lot of space, you should use thick absorbers if you can. A thickness of 50 cm can effectively absorb waves up to 500 Hz, and if you really have a lot of space, you can leave extra air between the wall and the absorber to really absorb all frequencies up to 100 Hz.
But that is very unrealistic, because there is hardly anyone who can afford to lose 1 meter of depth in a room. 30 cm already has a very good effect - I have that in my studio and can't complain.
7. Front wall
Absorbers should also be placed on the front wall, especially if the speakers are close to the wall. The area directly behind the speakers should be covered as thickly as possible with absorbers to absorb the sound waves coming from behind the speakers.

The closer the speakers are to the wall, the greater the bass problems, so for very close monitors, thicker absorbers should be used to absorb as much bass as possible.
The middle section can either be left empty or equipped with a combined absorber/diffuser that absorbs the low frequencies and reflects the high frequencies - but this is not absolutely necessary and is more of a luxury.
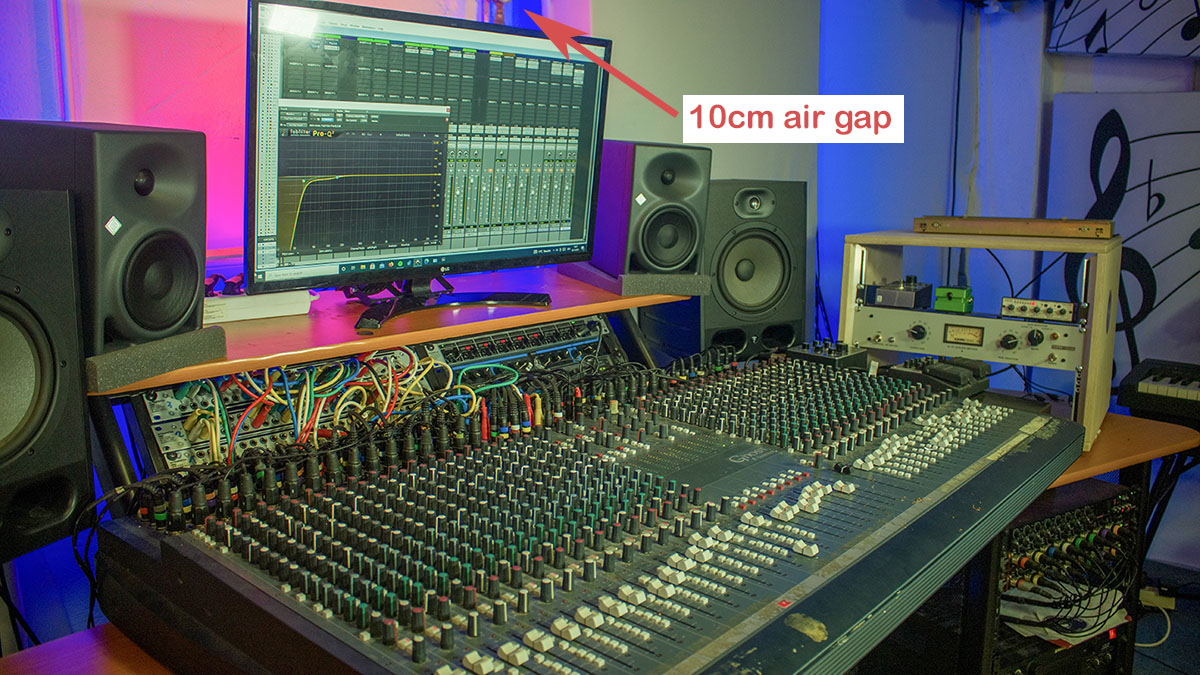
Again, the trick is to leave extra air between the absorber and the wall, as this makes the absorber effective at lower frequencies.
8. Floor
You can do relatively little on the floor - you can't put insulation on it, because you can't put furniture on it. But carpets are our best friends here, and as thick as possible. They can absorb the higher frequencies and reduce the overall reverberation time.
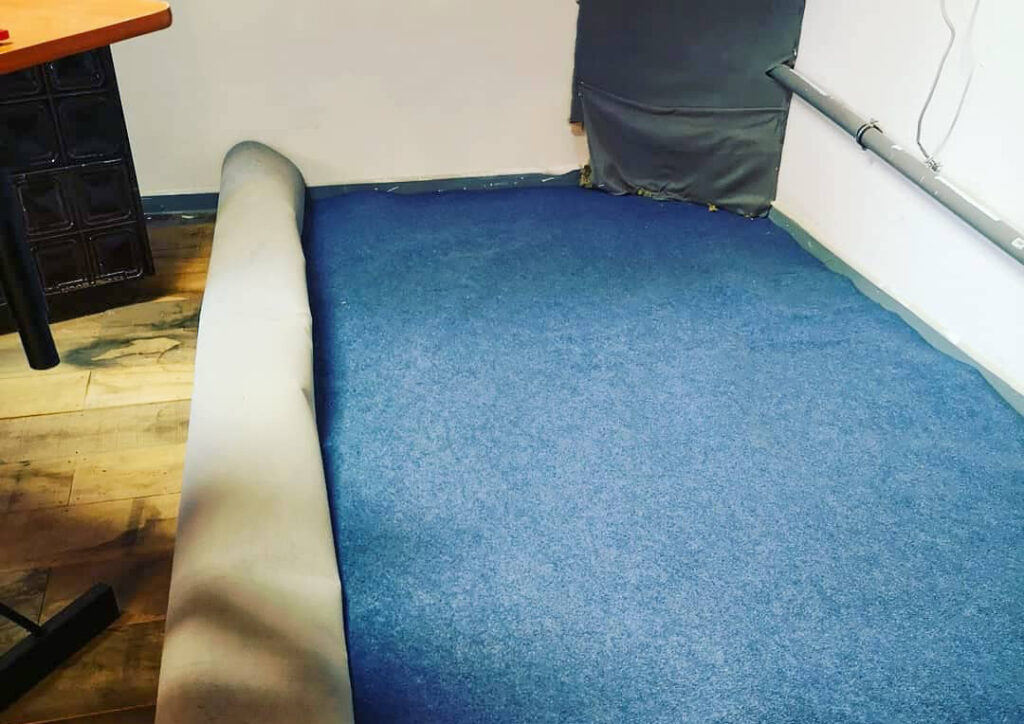
More is not possible here, but also not necessary. All the other walls are already so well insulated that we don't have to worry about the floor.
9. Set up equipment and enjoy
When you have completed all of these steps, you can set up your system and listen to how the sound has improved. You can measure again with a test microphone and the Room EQ Wizard - you will be amazed at how the curve has improved. But you will also be able to hear it without a microphone.
The good thing is that all of these measures we've taken also vastly improve the sound of the room for recordings with microphones - meaning your vocal recordings in this room will improve tremendously because we've solved just about all of the room problems.
Insulation vs Absorption
It is important to understand that all of these measures are only intended to improve the acoustics of the room. They are not designed to minimize the amount of outside noise entering the studio or to prevent neighbors from hearing your music.
This would require a completely different concept called isolation/insulation. Insulation prevents sound from entering a room from the outside, or vice versa. It is often used in recording studios, home theaters, offices or homes to reduce noise pollution from neighboring rooms. Insulation materials are usually dense and do not allow sound waves to pass through to minimize sound transmission. Examples include drywall, solid wood, or special soundproof windows.
Such a procedure is very expensive and requires professional craftsmen, since it is necessary to build a room within a room, which are completely isolated from each other.
Absorption, on the other hand, improves room acoustics within the room by reducing echo, reverberation, and standing waves. This results in improved sound quality and speech intelligibility. Absorbent materials are porous or fibrous and are able to allow sound waves to penetrate their structure.