
Modern productions use less and less real drums, as most modern genres mostly use drum samples from drum machines - but there are still some genres like rock, metal or reggae where a real drum kit is essential.
Even though recording a drum kit is quite tedious, it is a very rewarding and satisfying process because it just lays the foundation for the song and gives you so many possibilities to shape the sound - just by choosing the microphones and positioning them differently. That's always been the most fun for me personally!
In this tutorial you will learn how to record a real drum kit with many different microphones. We will use the usual method where each drum has its own mic (or two), two overhead mics for the whole set, and two room mics to capture the natural room sound of the drums.
The use of room microphones is optional and not essential if there are limited microphones available, but I highly recommend them if you have the option.
Keep reading:
- The 12 best drum sets for beginners
- The best electronic drum sets for beginners and professionals
- The best drum sets and e-drums for kids
Recording drums: What you need
The most important things you need to record a drum kit:
- Depending on the drum setup, between 8 and 14 microphones
- An audio interface with 8 to 14 channels, depending on the number of microphones used.
- A DAW
- Ideally, the room in which the drums are recorded should be acoustically treated
Microphones
A book could be written about drum mics, and every engineer has his or her own preferences. So there are no rules for using microphones on drums, but there are certain requirements. For example, the bass drum always needs certain microphones with good bass response, otherwise it sounds too thin with other microphones.
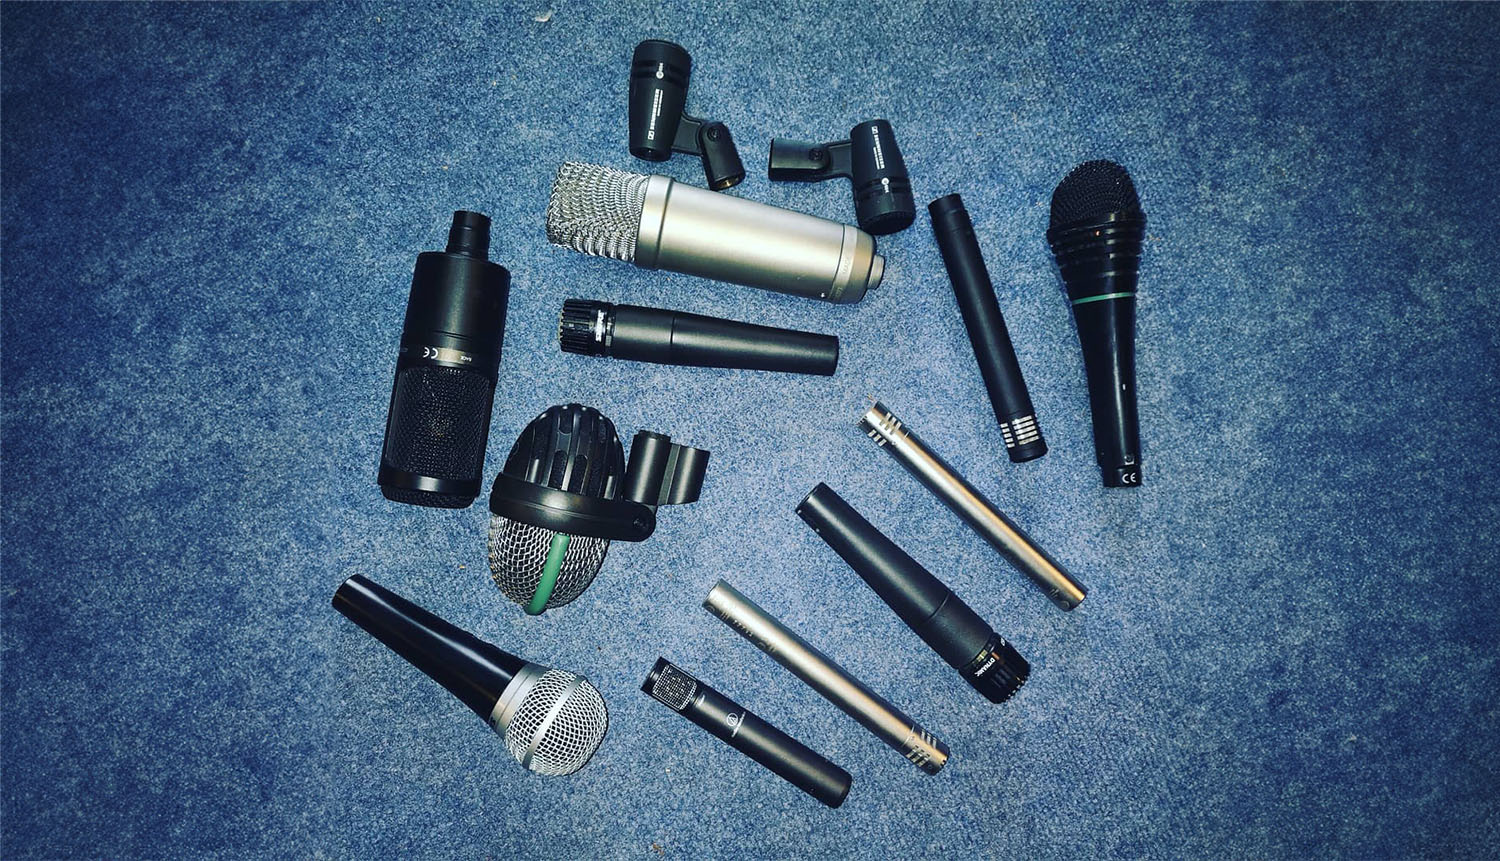
The setup I will be using is not expensive, with the exception of the Neumann U87, which is not necessary and can be replaced by a Rode NT1A. This is my setup:
- Kick drum: AKG D 112 (in the kick drum), Neumann U87Ai (outside the kick drum)
- Snare: Shure SM57 (top), Audio-Technica ATM 450 (down)
- Hi-Hat: Audio Technica AT4041
- Tom 1: Sennheiser E604
- Tom 2: Sennheiser E604
- Tom 3: Shure SM58
- Timbale: Shure SM57
- Overhead L/R: 2x AKG C 451 B
- Room microphones L/R: 2x Rode NT1A
In my case, I have the timbale, which is part of the drum kit. It has similar sound characteristics to the snare, so I also use a Shure SM57 for it.
There are drum microphone kits available from many brands if you want to buy all the microphones at once. However, I recommend buying the microphones individually, as not all microphones from one brand are best for all drums. Here is a list of the most popular drum microphones that most drummers use over and over again:
- Kick drum IN: AKG D 112, Shure Beta 52A, Shure Beta 91A, Electrovoice RE-20
- Kick drum OUT: Avantone Kick, Solomon SubKick LoFReQ
- Snare TOP: Shure SM57, Shure SM7B, Sennheiser E 906, Shure Beta 57 A
- Snare BOTTOM: Shure SM57, Audio-Technica ATM 450, AKG C414
- Hi-Hat: Audio Technica AT4041, Neumann KM184, Shure SM81
- Tom 1: Sennheiser E604, Sennheiser MD-421
- Tom 2: Sennheiser E604, Sennheiser MD-421
- Tom 3: Sennheiser E604, Sennheiser MD-421
- Overhead L/R: 2x AKG C 451 B, 2x Neumann U87Ai, 2x AKG C414
- Room microphones L/R: 2x Rode NT1A, 2x Neumann U87Ai, 2x AKG C414
Recording drums - Which interface?
➔ Here you can find my full guide to the best audio interfaces on the market.
Since you'll be using a lot of microphones, you'll also need an interface with a corresponding number of inputs - you'll need to be able to record all the microphones at the same time. You will need to use ADAT, because interfaces with more than 8 channels must be connected to a preamp via ADAT.
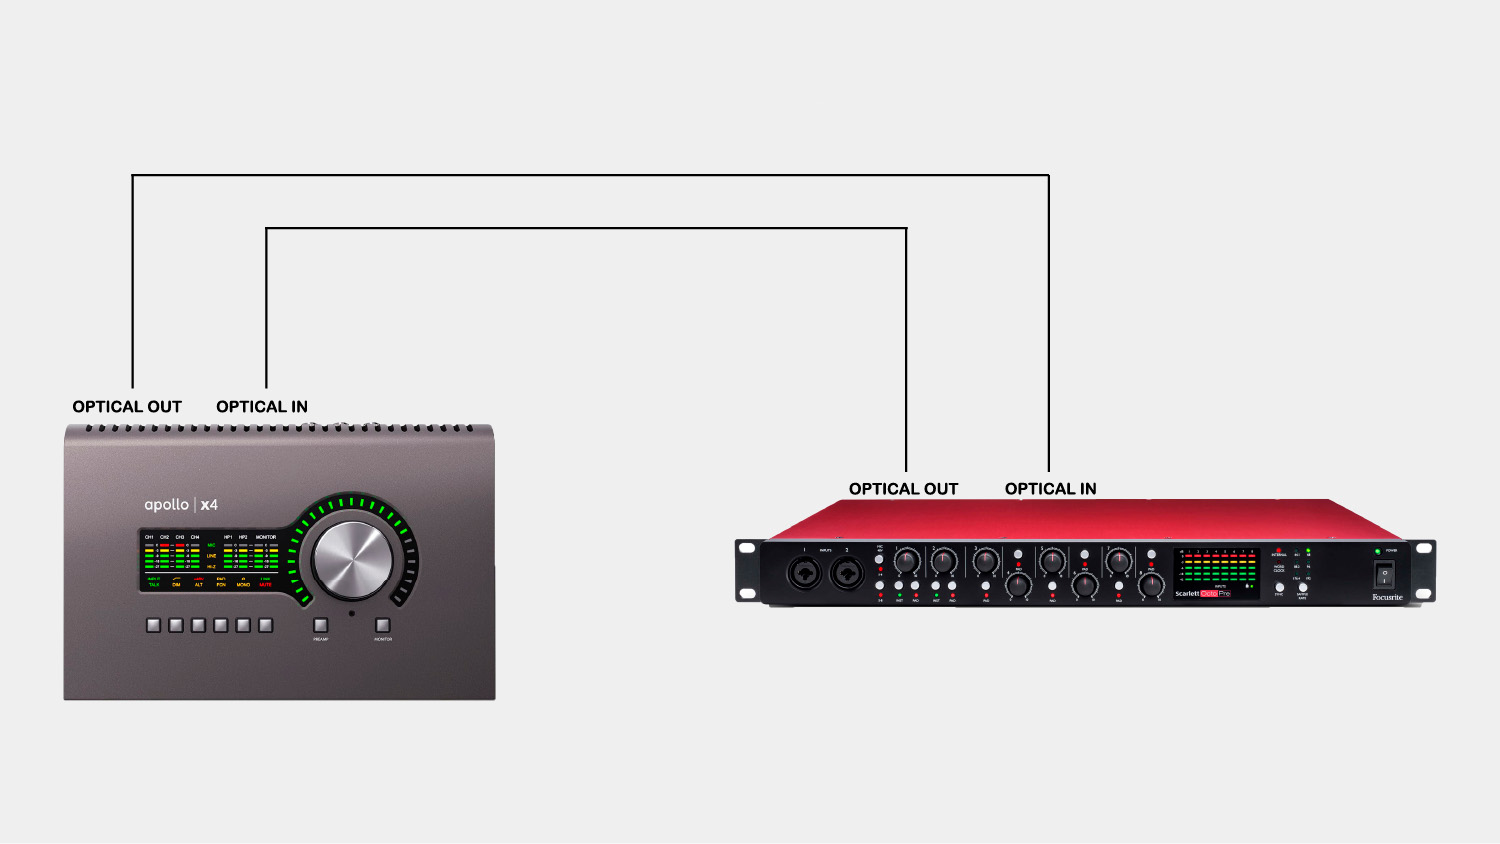
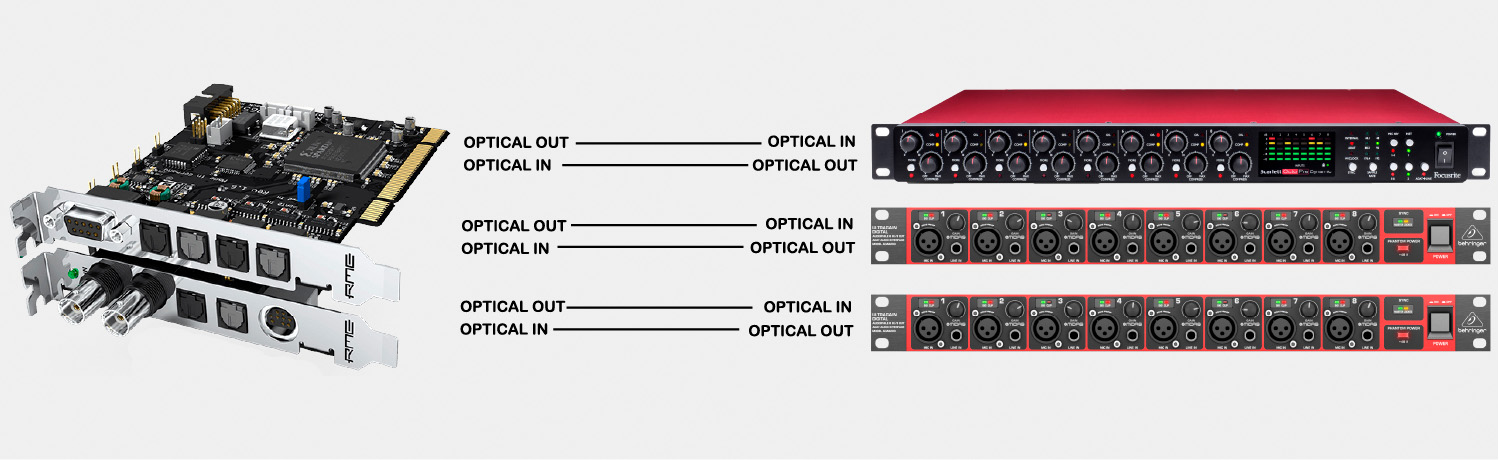
If you need such an audio interface and don't want to spend a lot of money, I recommend the Behringer UMC1820 (264€) and for a bit more money the Focusrite Scarlett 18i20 (499€). You would need an additional preamplifier with 8 channels, which you connect via ADAT to the interface, to get to the 12 input channels.
In this case I can only recommend Behringer and Focusrite, i.e. the Behringer ADA8200 Ultragain (264€) or the Focusrite Scarlett OctoPre (414€) - so I would buy interface and preamp from the same brand, so that all 12 preamps sound the same and a consistent drum sound is created.
If you have more money to spare, you can buy more expensive preamps, like the NEVE 1073OPX (4,222€) - but you'd need at least two of them, which in this case would be over 8,000€. But if you have the money, the Neve is definitely worth a purchase.
Alternatively, you can record with a mixer, such as the popular Behringer X32, if the mixer can be connected to the computer via USB and act as an audio interface.
DAW with multi-channel recording capability
All professional DAWs can do multichannel recording these days, but some are better optimized for it and offer a better workflow. Pro Tools, Ableton Live, Logic Pro, Cubase or Reaper are all very good. Personally, I use Pro Tools because I think the workflow is unbeatable.
By grouping all the drum tracks, you can create a new playlist for each track with a single click, so you can record the same sequence multiple times to different playlists, then pick the best parts and edit them together. Editing is also extremely easy because all the tracks are grouped together - it feels like you are working with one track, not 12.
That's why it's important to group the tracks and always edit the whole group to keep everything in sync. You can't just move the bass drum track after you've recorded it, or everything will be out of sync. Also keep in mind that instruments are not perfectly isolated on each mic, so the hi-hat will still be heard on the snare mic, or the snare drum on the kick mic (this is called bleeding).
Acoustically optimized room
The fact is that a drum kit needs to be in an acoustically optimized room to get the best possible sound. If not, the drums will not sound dry, blurry, and just not good. This is because the drums are loud and the sound waves bounce off all the walls and into the microphones.

If there is no way to improve the room's acoustics, you should place the microphones as close to the drums as possible, so that you pick up as much direct sound as possible and as little reflections as possible. In this case, do not use room mics.
As an absolute minimum, place a large carpet under the drum kit, place absorbers on the walls directly beside the drum kit, and place absorbers on the ceiling directly above the drum kit. This will effectively absorb the initial sound reflections.
It's best to treat the whole room so that the room mics sound good from a distance - then you can mix in the natural room sound of the drums. And the whole kit will definitely sound much better and more defined.
In addition to absorbers on the walls and ceiling, a complete optimization also includes bass traps in the room to absorb the low frequencies. I highly recommend this - without it, there are problems like standing waves with the bass drum. I didn't realize how bad my drums sounded until I optimized my room and heard the difference - the bass drum was more present, everything sounded much drier and clearer, and suddenly I finally had decent channel separation.
If you want to learn more about optimizing room acoustics, I recommend my detailed article on DIY improving room acoustics in the studio. There I explain how you can effectively and efficiently improve room acoustics with little effort.
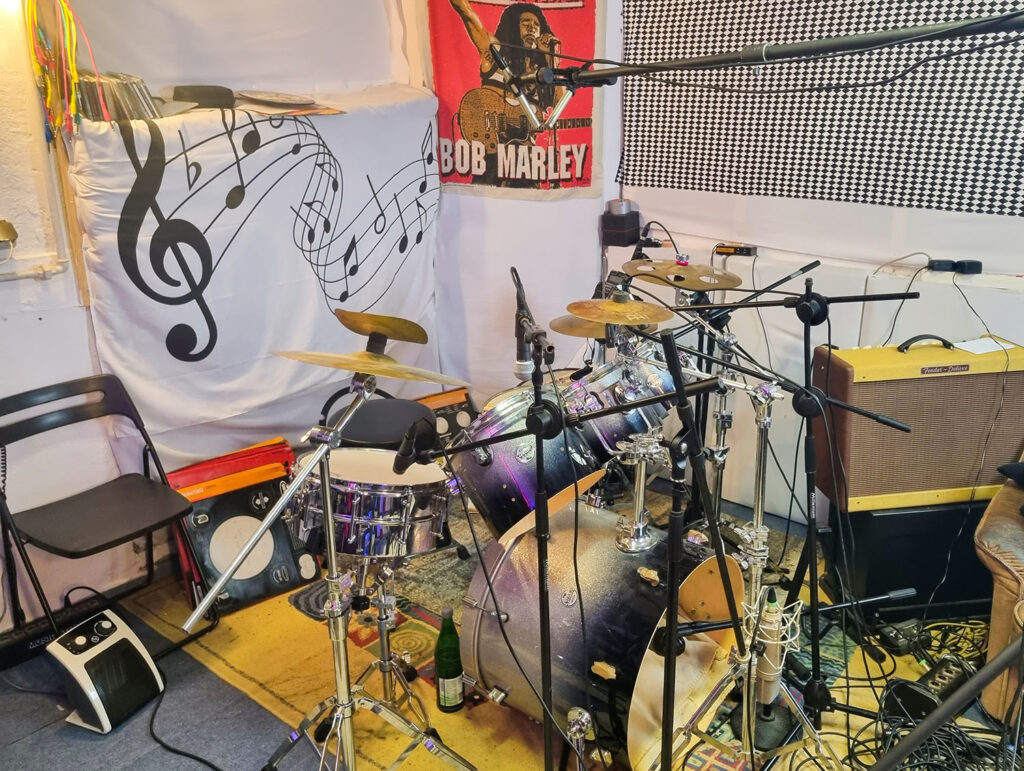
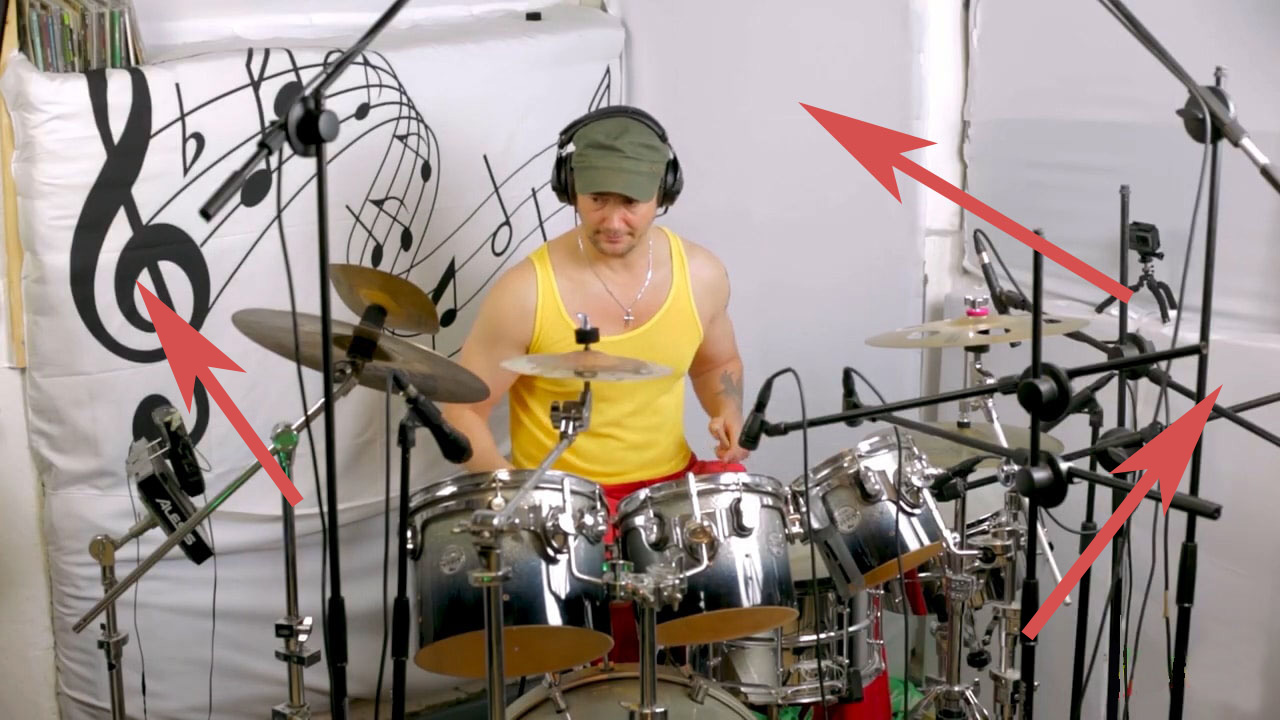
Recording drums - Step 1: Placing the microphones
After setting up your drum kit, you should set up and place the microphones. The placement of the microphones is the most important thing when recording a drum kit - good placement makes a big difference to the sound. For example, the snare can have more or less attack (more "snap") depending on the position of the microphones, and the bass drum can sound boomy or more defined and clear depending on the position of the microphones.
The most important drums - bass drum and snare drum - are usually recorded with two mics to give you more options for shaping the sound later in the mix. Depending on which microphone is louder or quieter, the bass drum or snare drum will have a different timbre.
In the following I will explain a guide with different possible positions and the effect of each position on the sound.
Recording the bass drum:
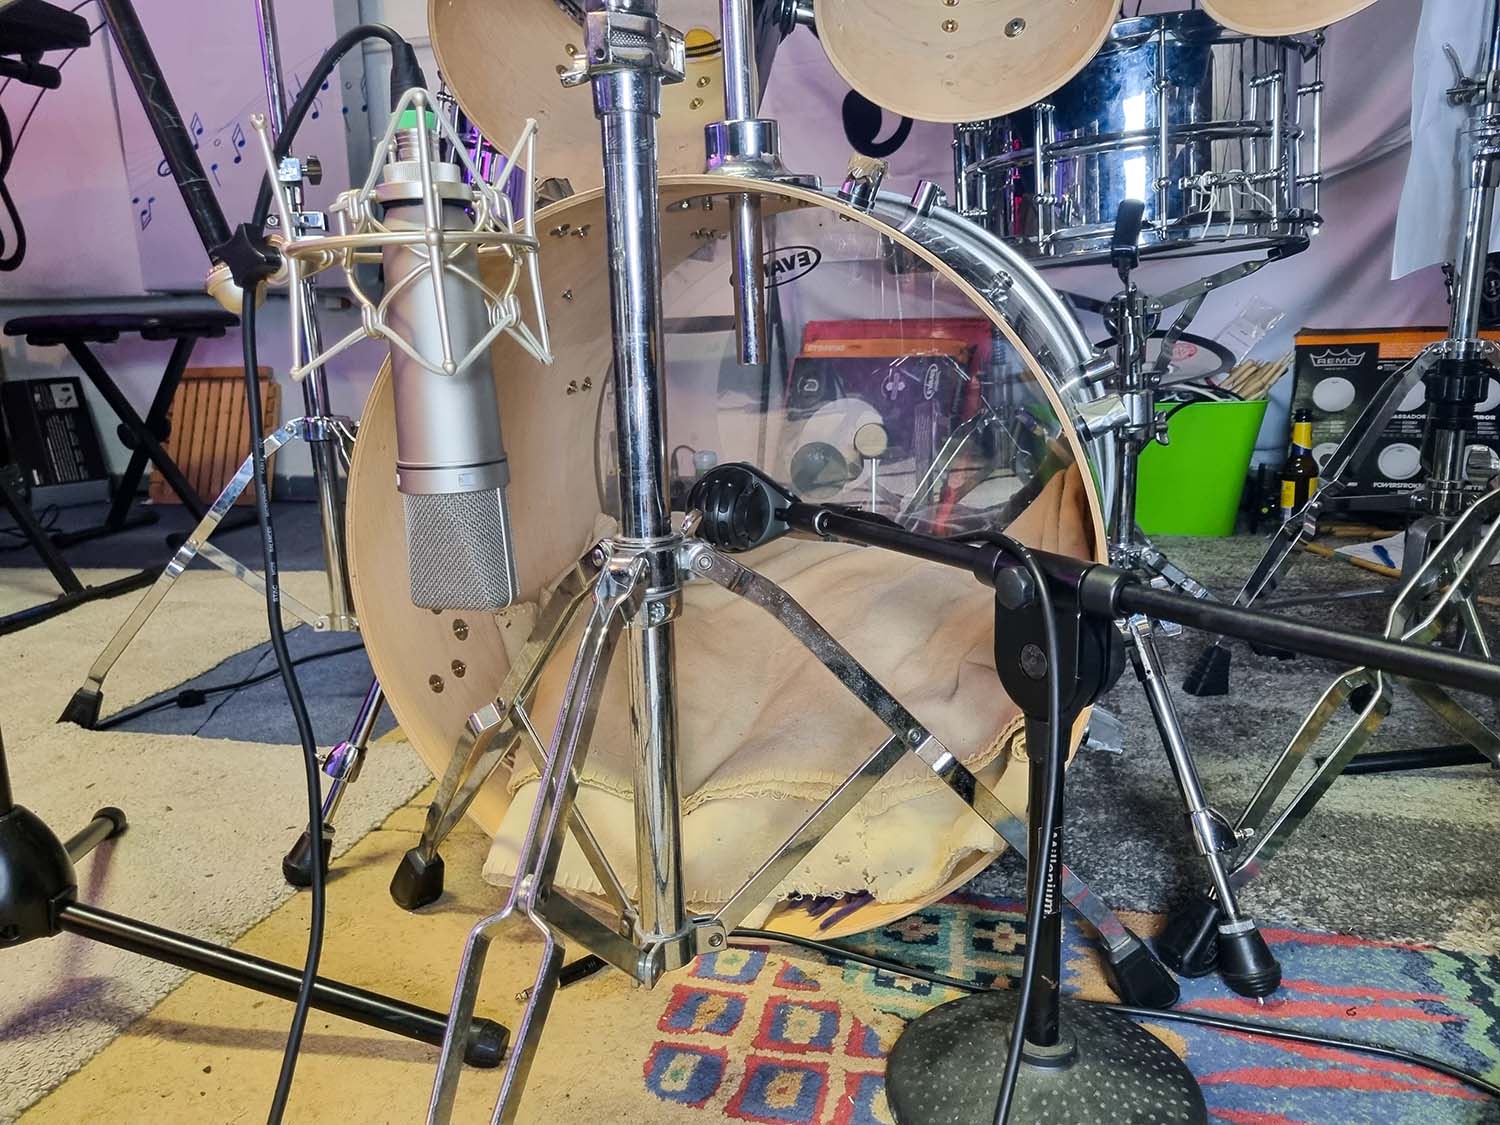
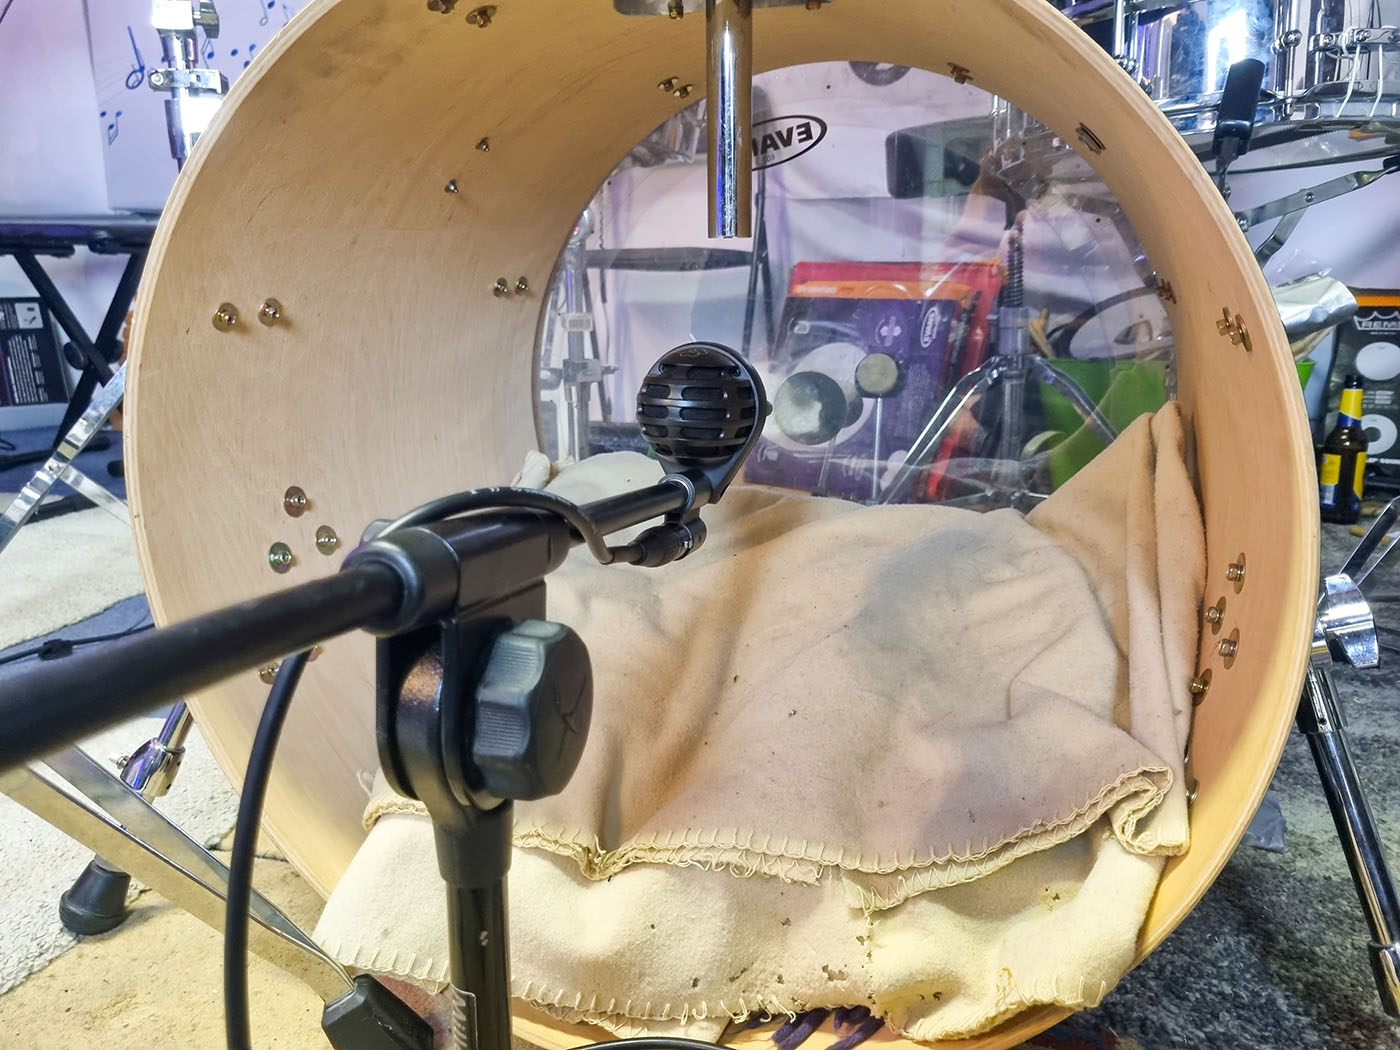
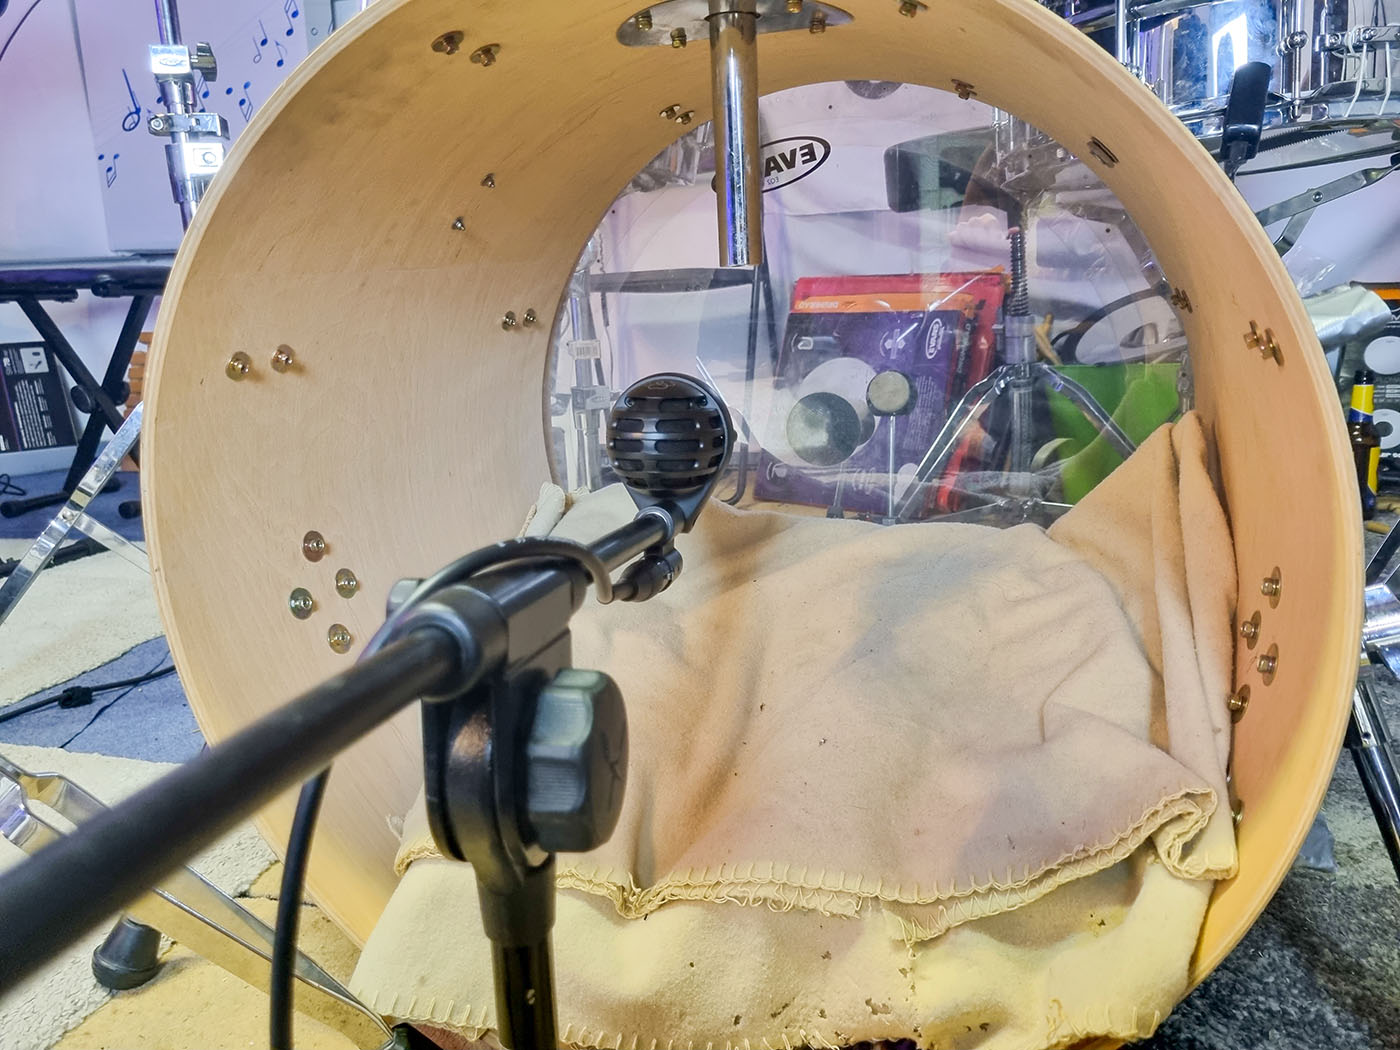
The bass drum is usually miked with one or two mics, an inside mic and, if budget allows, an outside mic. When the outside head is mounted, the inside mic is either held precisely through the hole inside the drum with a special mic stand, or a boundary microphone such as the Shure Beta 91A is used, which is simply placed into the bass drum.
Popular microphones for the inside of the bass drum are the AKG D112 and the Shure Beta 52A - they sound very good in most cases. In any case, a dynamic microphone should be used. The positioning is extremely important: The closer the microphone is to the drumhead, the more attack the sound will have. The farther away, the "thicker" and fuller the sound will be.
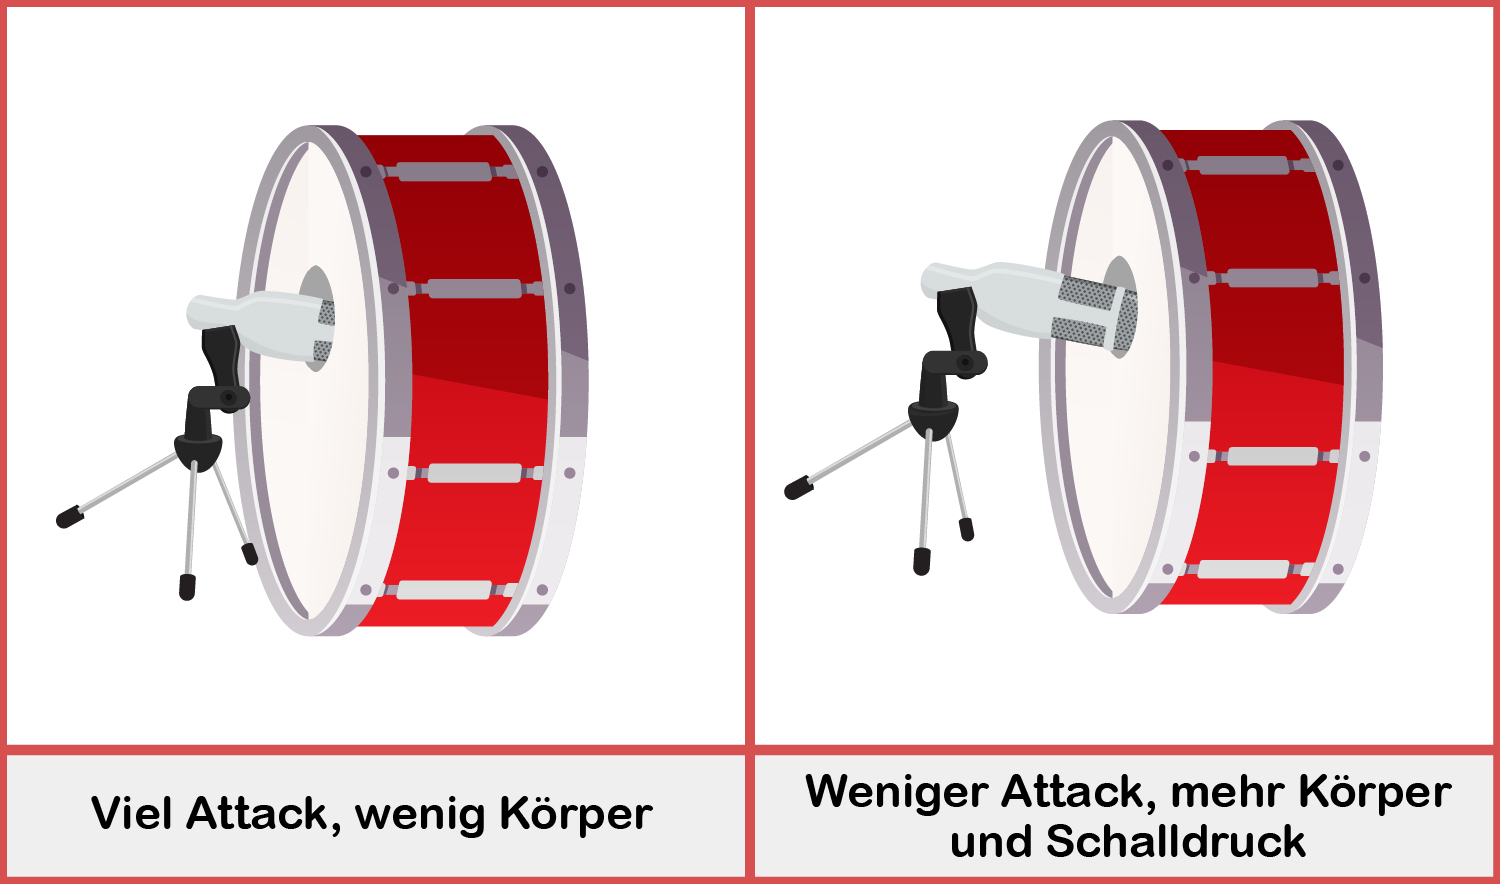
Another important aspect is the orientation of the microphone: If the microphone is placed right where the pedal touches the drumhead, the sound gets a very strong attack that is very assertive. It's great for metal, for example, to get that typical piercing kick.
For other genres, such a strong attack can be unpleasant - by moving the microphone away from the direct pickup point and more toward the edge, the attack is reduced and becomes more moderate.
A good starting point for most is to position the microphone directly behind the hole (8-16 cm from the batter head) and slightly off the axis of the batter pedal to avoid excessive attack. Then you can listen and adjust the position and angle as needed.
A common problem when recording a bass drum is excessive resonance - too much "boom" in the sound. To reduce such resonance, blankets or pillows are placed inside the bass drum. I always use blankets. You just have to find out how many you need to get the sound you want.
To do this, record the bass drum alone with exactly the same microphone position, one after the other with 1, 2, 3, etc. blankets inside, and compare the recordings later. It is also worth recording the whole drum kit with different numbers of blankets in the bass drum to hear how the whole drum kit sounds.
For Reggae recordings I use up to 3 blankets on the bass drum, because the bass drum has to sound extremely dry in this genre. For rock and pop recordings I usually use only one blanket or none at all, depending on the song.
If the budget allows it, a second microphone is used outside of the kick drum. A very popular mic for this is the Avantone Kick, which has a large diaphragm and can pick up the very low frequencies very well. Otherwise you can use a large diaphragm condenser - I have always used the Rode NT1A or the Neumann U87Ai and both do the job very well.
The purpose of this second microphone is to pick up the very low frequencies of the bass drum to give the sound more power and body. You could say that the inner microphone provides clarity and definition and the outer microphone provides volume and power.
The outer microphone is placed 5-15 cm away from the outer drumhead - again, you should experiment a bit and make sure that if the distance is too great, not too much of the other drums will penetrate through the microphone. If necessary, you can also use a low-pass filter to filter out unwanted sounds.
If you use a condenser microphone for this, be sure to use as little gain as possible, because the bass drum is very loud and condenser microphones are very sensitive.
When mixing, the second mic is added to the first, and you can immediately hear that the second mic adds the right low frequencies to the bass drum, giving it much more body.
If you don't have the money for a second mic, you can simulate this effect by boosting the bass drum's very low frequencies with an EQ.
Recording the snare
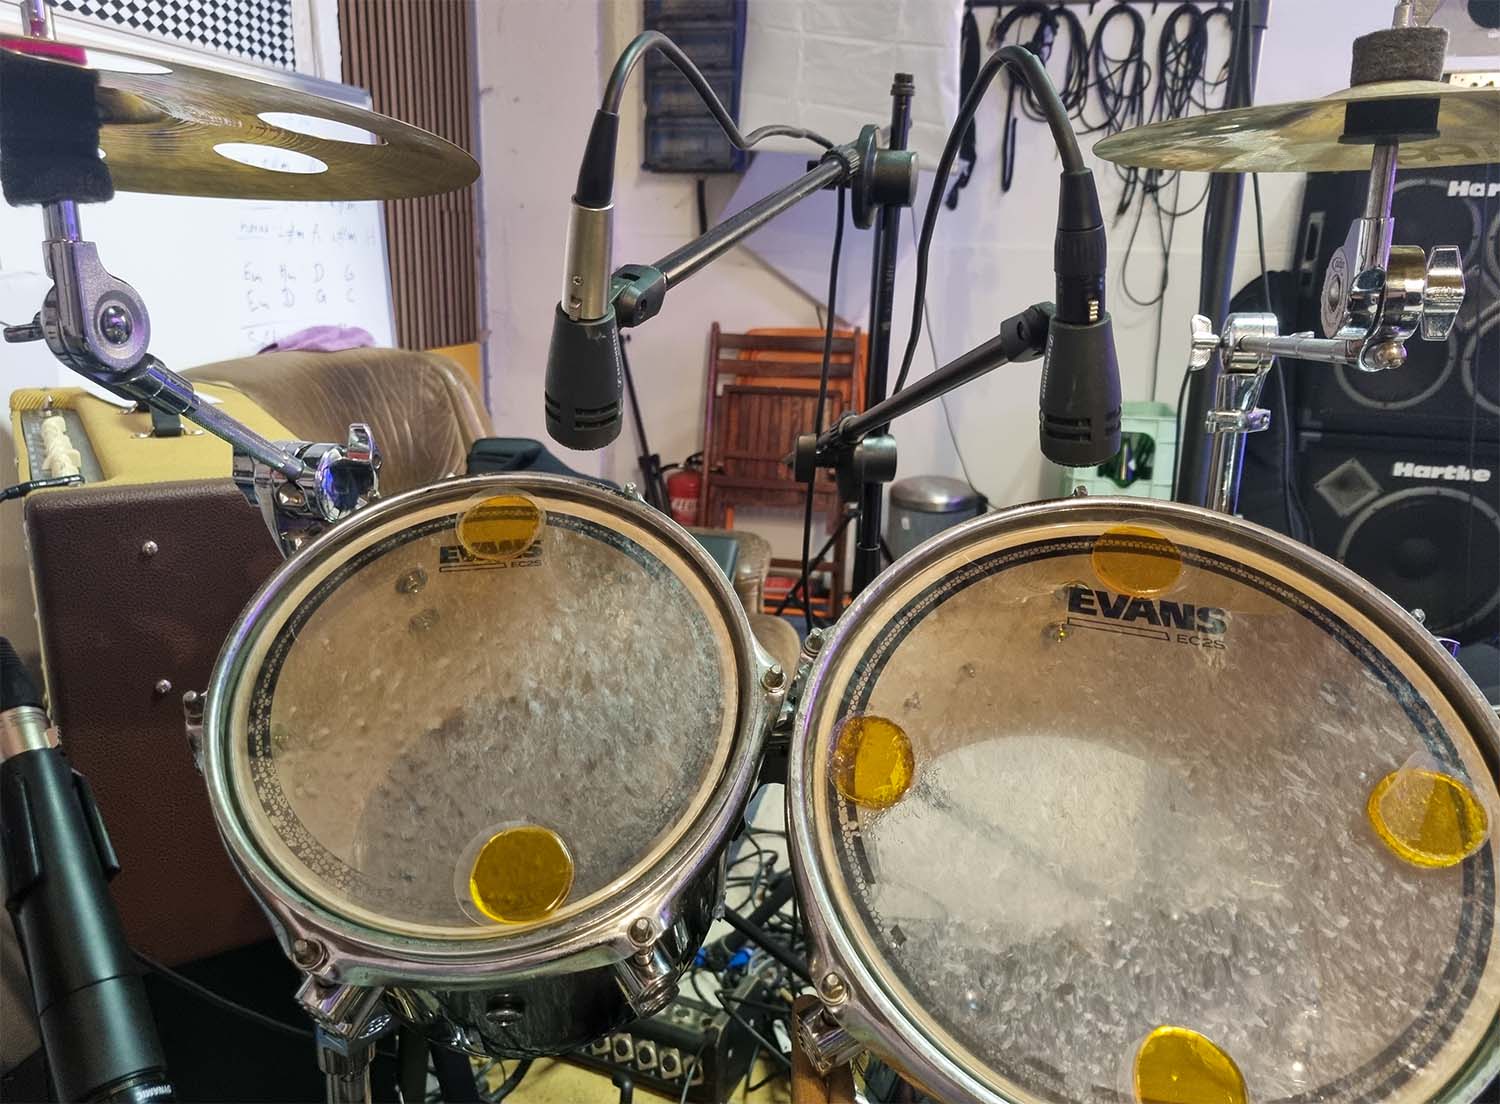
The snare drum is miked with at least one, but usually two mics. The main microphone is always a dynamic mic - very often a Shure SM57 - placed directly above the snare and aimed either at the center of the drum or at the rim.
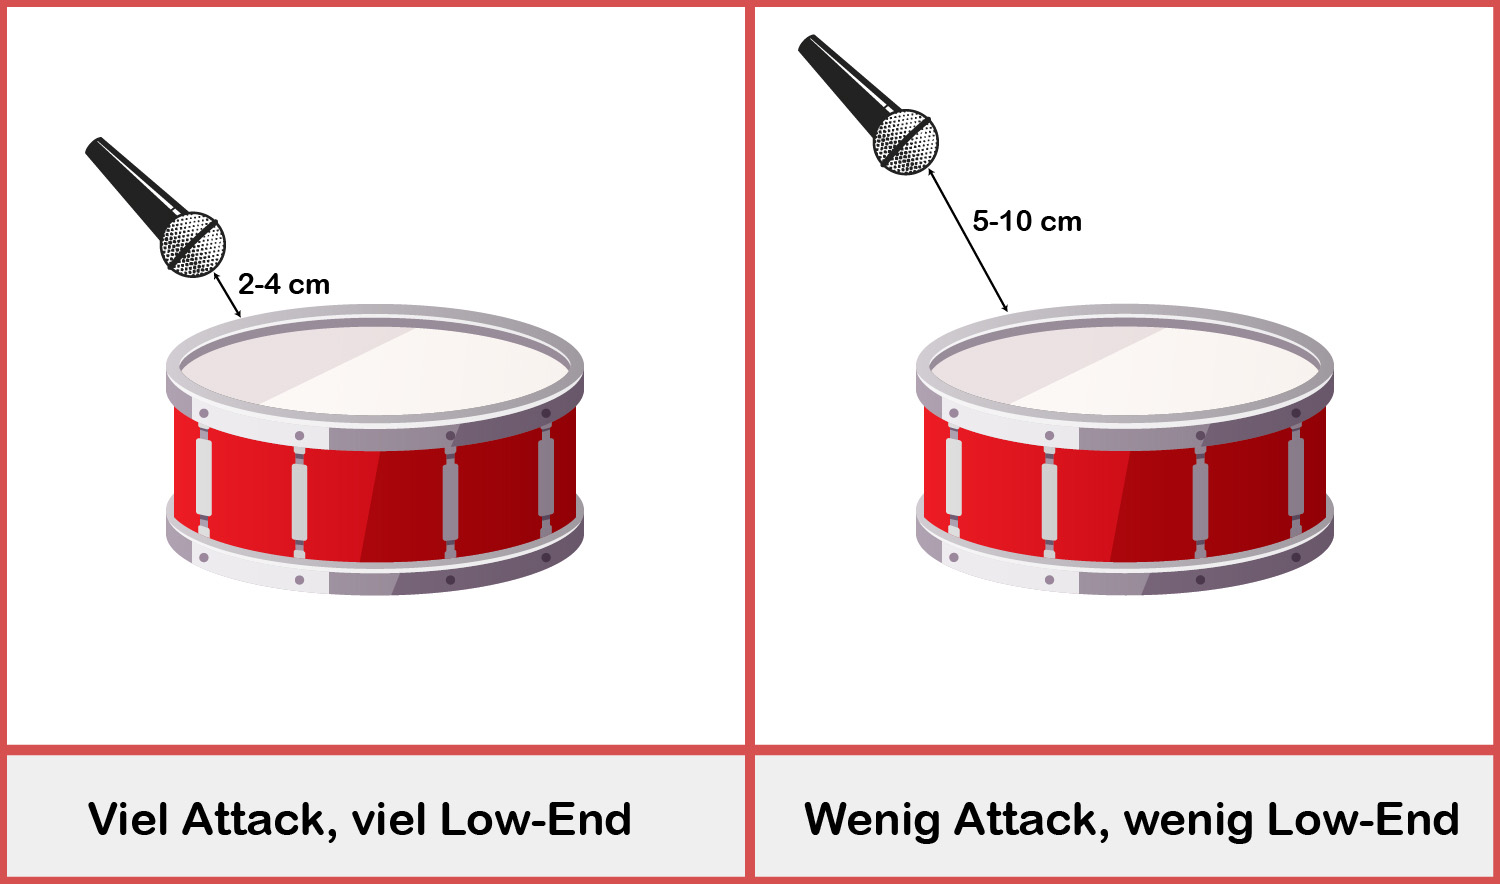
The distance of the microphone from the snare and its direction also have a huge influence on the sound. The closer the mic is to the snare, the more attack it picks up - so the snare sounds very punchy and assertive when it is close to the head. The low end is also emphasized more because of the proximity effect. If you move the mic further away, the sound will have less attack and less low end.
The angle of the microphone also plays an important role: If you point the microphone directly at the center of the drum, you will get a stronger low end, but less of the actual "snare sound". If you tilt the microphone more towards the edge of the snare drum, it will sound more natural because it will pick up all the resonances that you would expect from a snare drum.
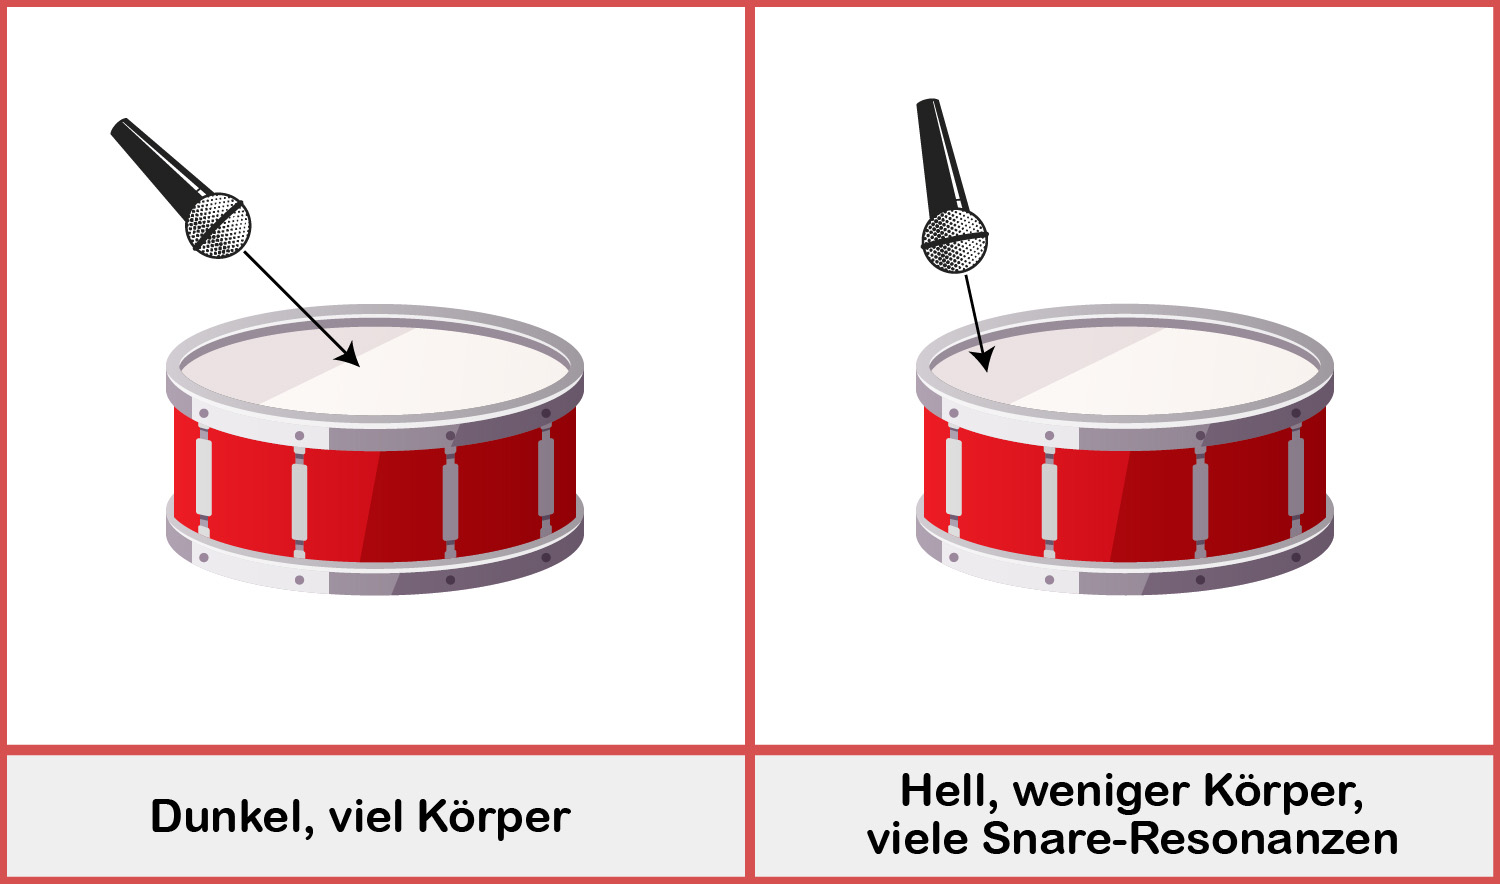
It is worth experimenting, recording, and comparing different positions until you find the perfect one. A good starting point is a distance of about 3-4 cm between the microphone and the snare, and a tilt where the microphone is not aimed directly at the center, but rather between the center and the edge (as in the picture above right).
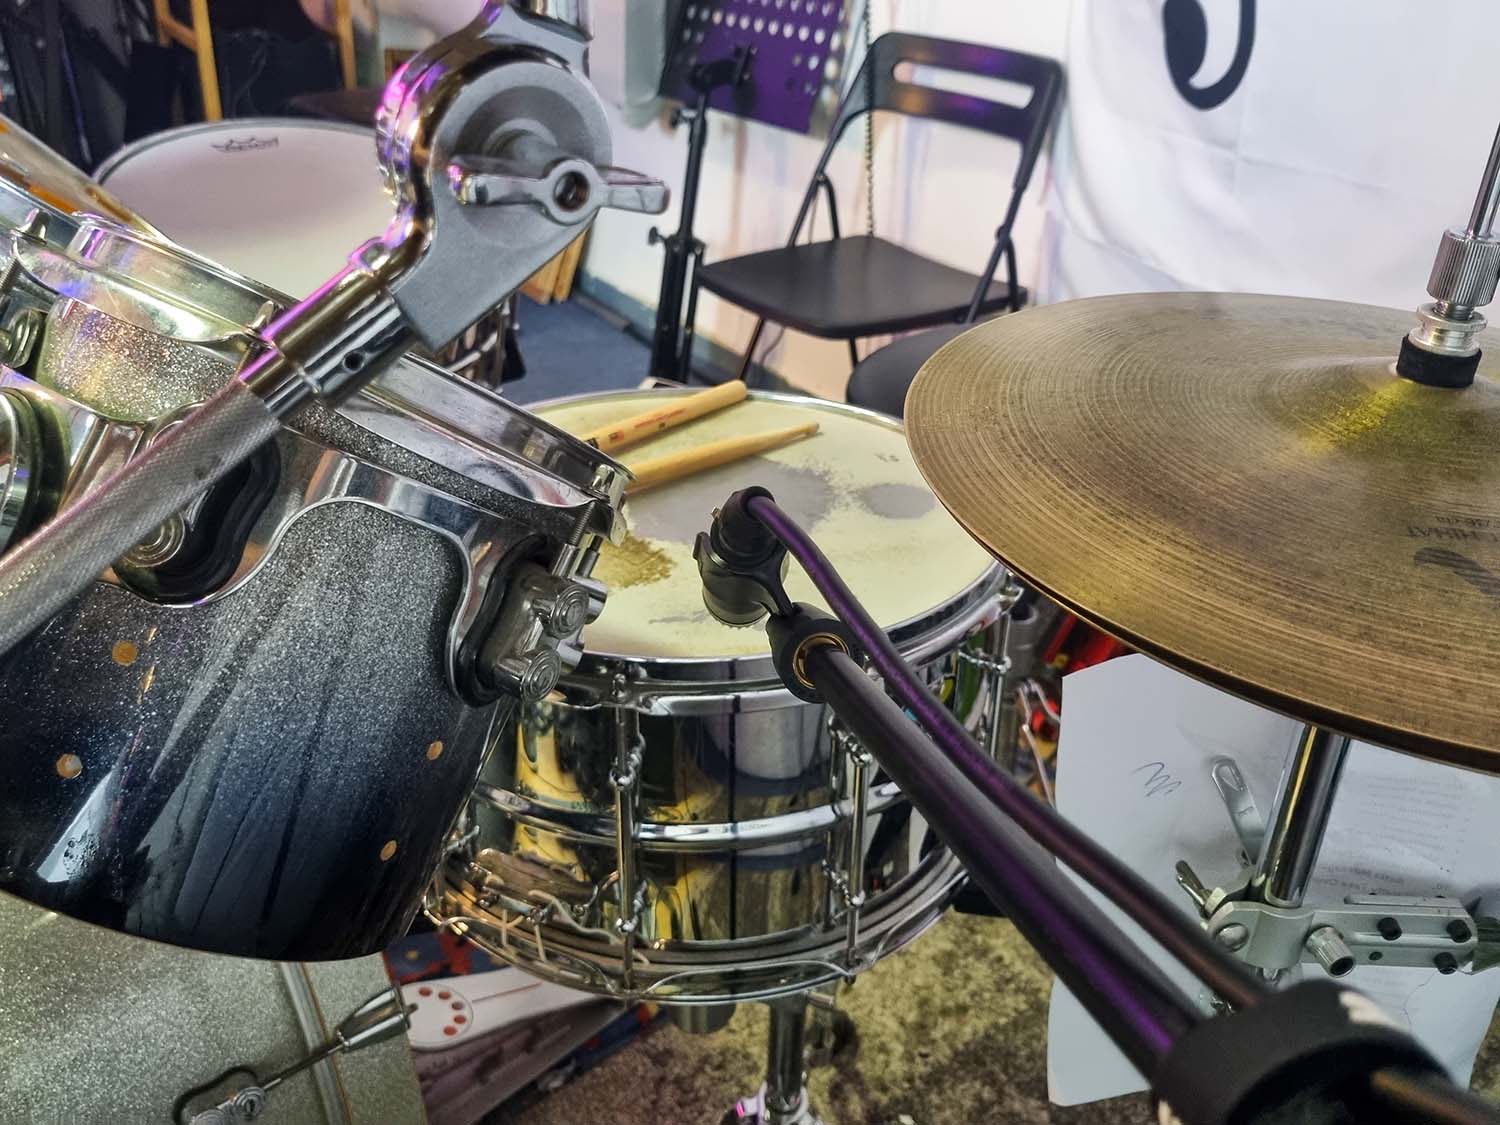
Very important: The microphone must not interfere with the drummer! You cannot expect the drummer to play more carefully or to do anything different from what he is used to, as this can severely degrade his performance. Usually, the snare microphone can be placed between the tom and the hi-hat so that it does not disturb the drummer in any way.
The second microphone is not absolutely necessary, but if you have the option, you should use it. You can use the exact same microphone - the Shure SM57 works very well. You can also use condenser mics like the AKG C414 or the Rode NT1A.
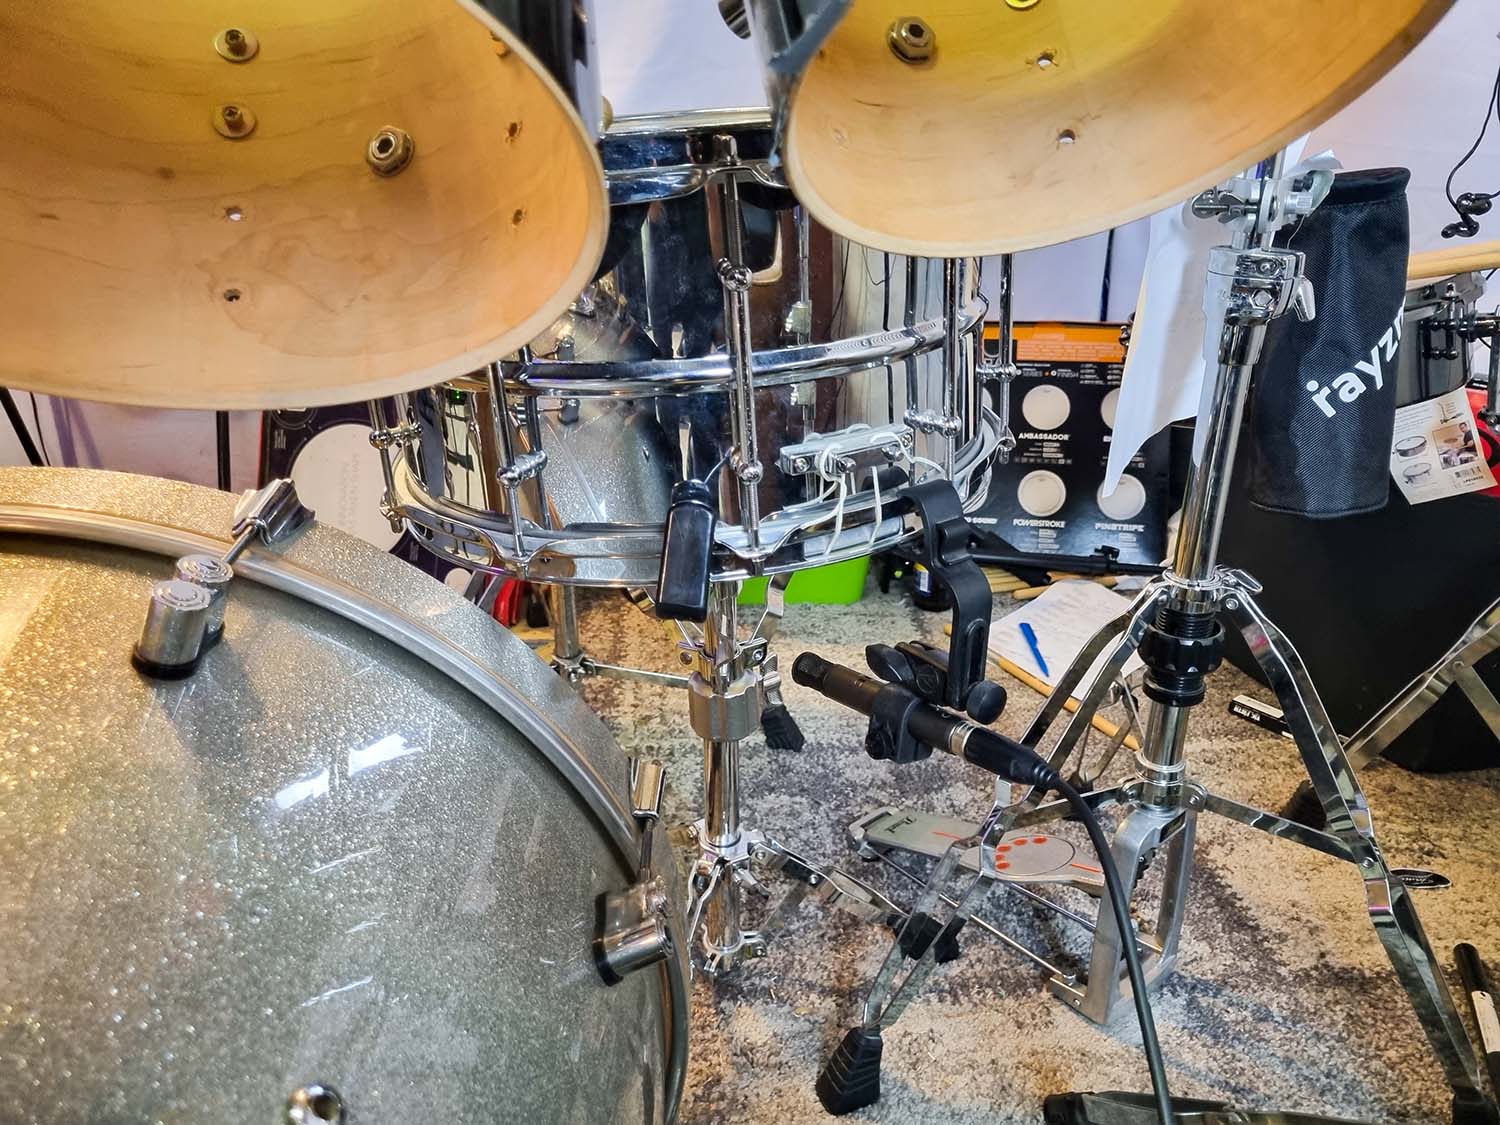
This second microphone is placed under the snare drum and picks up the bright resonances of the snare carpet and the "buzz". This makes the sound a little "crisper" and brighter. It is placed 5 to 10 cm from the bottom of the drum, often with no tilt.
| Watch out for phase problems! |
|---|
| Very important: If you are using two mics for the snare drum, you need to be aware of phase issues - especially if you are using the same mic for both the top and the bottom. If one mic is a dynamic and the other a condenser, there is usually no problem, but you should still check. Just reverse the phase of the second mic and compare which one sounds better (if there are phase problems, it will be especially noticeable in the bass range - it will sound weaker than in the correct phase version). |
If you want to dampen the snare drum a bit for recording the drums, you can very well use a T-shirt or similar for this. Of course, there are also special damping rings for this, but a T-shirt or generally something made of fabric does it too. Just stretch it over the top skin and you'll hear significant damping.
Hi-Hat
The hi-hat is not always miked individually - this is simply because the hi-hat is very loud and is usually heard clearly over the overhead mics. But if you have the possibility, it is always good to mic it separately.
It just gives you more control when you're mixing - if you don't mic them individually, and you notice that the cymbals are too loud and the hi-hat is too soft, you have no way of balancing it. And if you want to do special effects on just the hi-hat - phasers or flangers are sometimes used - then you really need to mic them individually.
The hi-hat is usually recorded with a small-diaphragm condenser microphone, because it has a very natural sound and the hi-hat has no low frequencies anyway (small-diaphragm microphones are a bit weak in the low frequency range).
The most popular microphones for hihat recording are the Neumann KM184, the Shure SM81 and the Audio-Technica AT4041. I've been using the latter for over 4 years and I'm very happy with it - besides hihat, it's also great for acoustic guitar.
You always have to keep a certain distance between the mic and the hi-hat, otherwise the proximity effect will occur and the timbre of the hi-hat will become very dark. A distance of about 7-15 cm makes the hi-hat sound very natural - that's a good starting point.
When placing the mic, make sure it is slightly off-center from the hi-hat and facing the opposite direction of the snare. The reason for this is simple: the snare is so loud that otherwise you will hear it very strongly over the hi-hat mic, sometimes even louder than the hi-hat itself (this has happened to me before). In this case, the mic would be useless because it would become more of a snare mic than a hi-hat mic.
Toms
Toms are relatively easy to mic. I usually use dynamic mics, sometimes condenser mics for the floor tom, because they pick up the very low frequencies a little better. But I always prefer to use the same microphone three times for all three toms, so the sound is more homogeneous.
The most popular tom mic is undoubtedly the Sennheiser MD-421, a super all-round mic that can also be used for many other instruments. However, it's a bit expensive (considering that you need several of them, in my case 3) - so there are also very good, cheaper alternatives, like the Sennheiser E604. I have 3 of them and I'm very happy with them - you can also attach them directly to the tom and then you don't need a stand anymore.
The Sennheiser E 904 also work well for the toms, but are a bit more expensive. You can also use a Shure SM57 or SM58 for the toms, but you won't get as much low end, but you can always add some EQ afterwards.
The position of the microphone affects the sound in a similar way to the snare drum: a close placement emphasizes the low frequencies due to the proximity effect (which actually suits the toms very well), a far placement sounds a bit more natural, but then there are bleeding problems because the toms mix with each other in the channels.
When placed very close, it is unavoidable to point the microphone at the edge of the tom so that the drummer does not hit the microphone with his sticks. This makes the attack a little more moderate than if the mic is placed a little further away and aimed at the center of the drumhead. In this case the attack is emphasized very much, similar to the snare, and can sound a bit unnatural.
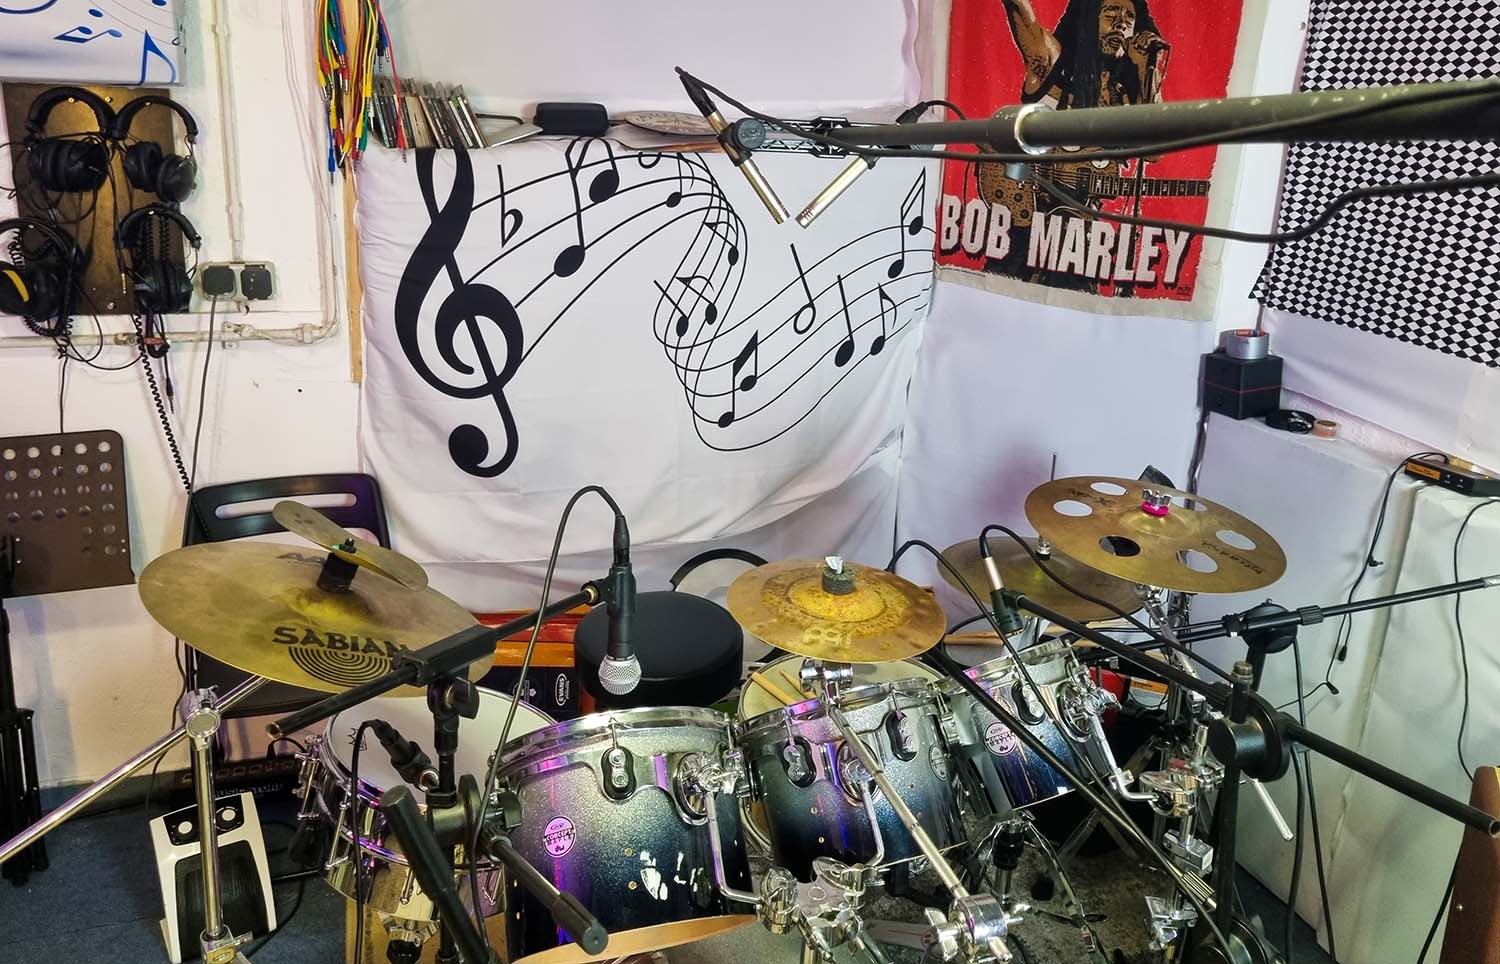
Overhead microphones (for cymbals + stereo image of the entire drum kit)
Overhead microphones are microphones that are placed above the entire drum kit and pick up the cymbals in particular. They also pick up the entire drum kit. Typically, two overhead mics are used, placed left and right of the center of the drum kit. When mixing, these channels are panned completely to the left and right, creating a nice stereo image of the entire drum kit.
Condenser microphones are always chosen because they sound more natural than dynamic microphones. You can choose between large-diaphragm and small-diaphragm microphones. Both are very good. If you use large-diaphragm mics, you will get more of the bass drum over the overheads; if you use small-diaphragm mics, you will get less of the bass drum over the overheads.
An alternative for the overheads are ribbon mics, which are very popular among many producers because they have softer highs, so the cymbals don't "sizzle" as much and sound a little more natural. They also sound very detailed, almost like condenser mics.
There are several different techniques for recording a stereo instrument with two mics - the following are the most popular for drum overheads:
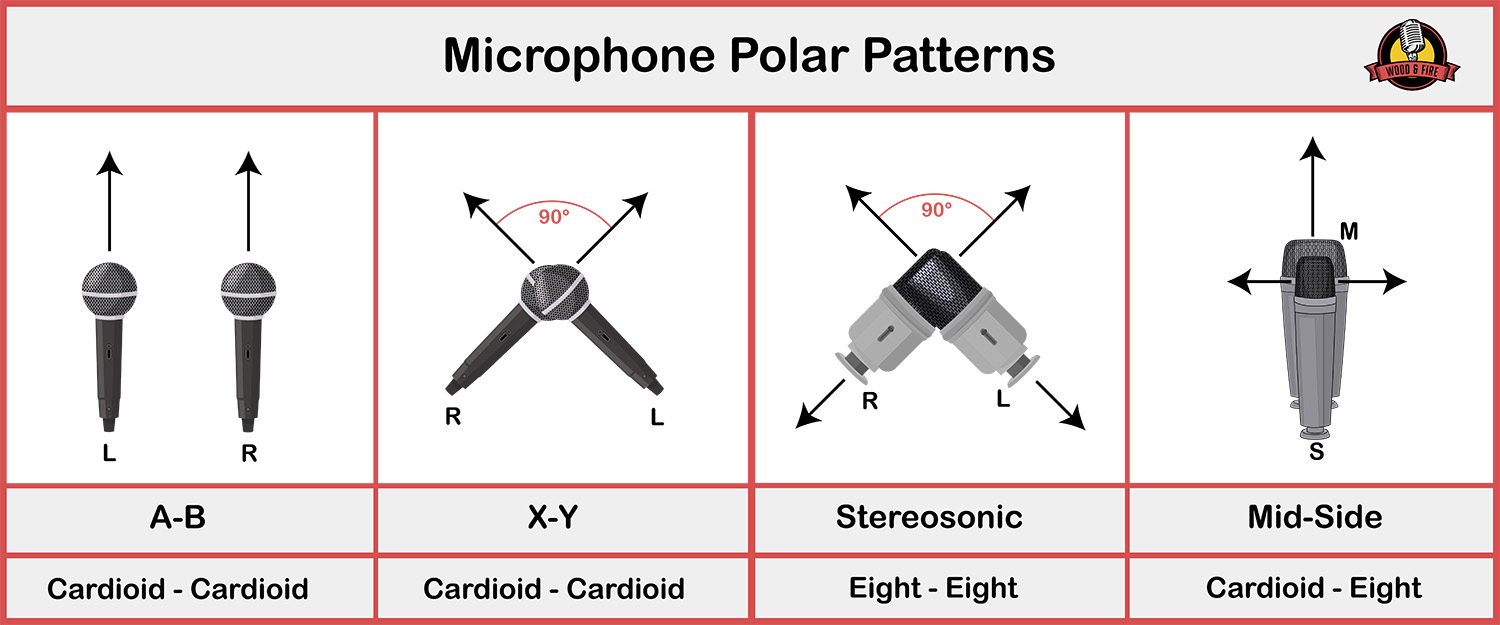
- AB arrangement: Here, the two cardioid microphones are placed parallel to each other. The distance can vary, but I always recommend a small distance to avoid phase problems.
- XY arrangement: Two cardioid microphones are placed directly side by side with their capsules at a 90° angle.
- Stereosonic: The setup here is the same as the XY setup, but two figure-of-eight microphones are used to add more atmosphere to the stereo image.
- M/S arrangement: For this technique, you need two identical microphones with switchable polar pattern, such as 2x Neumann U87 or 2x AKG C414, so that you select the cardioid characteristic with one and the figure-of-eight characteristic with the other. The one with the cardioid pattern is aimed directly at the drums, the one with the figure-of-eight pattern exactly perpendicular to it to pick up the sides.
Personally, I almost always use the AB or XY arrangement and place the microphones very close together, about 10 cm apart. This avoids a lot of phase problems! If you place the microphones in an AB pattern, but keep them more than 1 m apart, it's a miracle if you don't have phase problems.
In any case, you should check the polarity (i.e., phase) of all the microphones (especially the kick and snare) in combination with the overheads to hear if there are any phase problems. The sound wave from the bass drum reaches the bass drum microphone at a certain point in time, but the overhead microphones are a little later and correspondingly out of phase because they are farther away. This can cause problems.
You should try to get the snare as close to the center of the overheads as possible - you can move the two mics a bit towards the snare if this doesn't make the cymbals sound unbalanced in the stereo image - because the cymbals are the most important thing in the overheads.
However, from experience I can say that it is not so bad if the snare sounds a little to the left or right in the overheads, because the actual snare mic is then so loud and in the middle of the mix that the snare is centered again.
Room microphones
Room microphones are not essential. But if you have an acoustically optimized room, you should definitely use them. They provide a very nice, natural reverb that makes the drums sound much more natural than artificial reverb effects.
Large-diaphragm condenser mics are usually chosen for the room mics because they can cover the widest frequency range. They are placed in one of the above stereo arrangements in a straight line to the drums (so that the bass drum is directly facing the microphones).
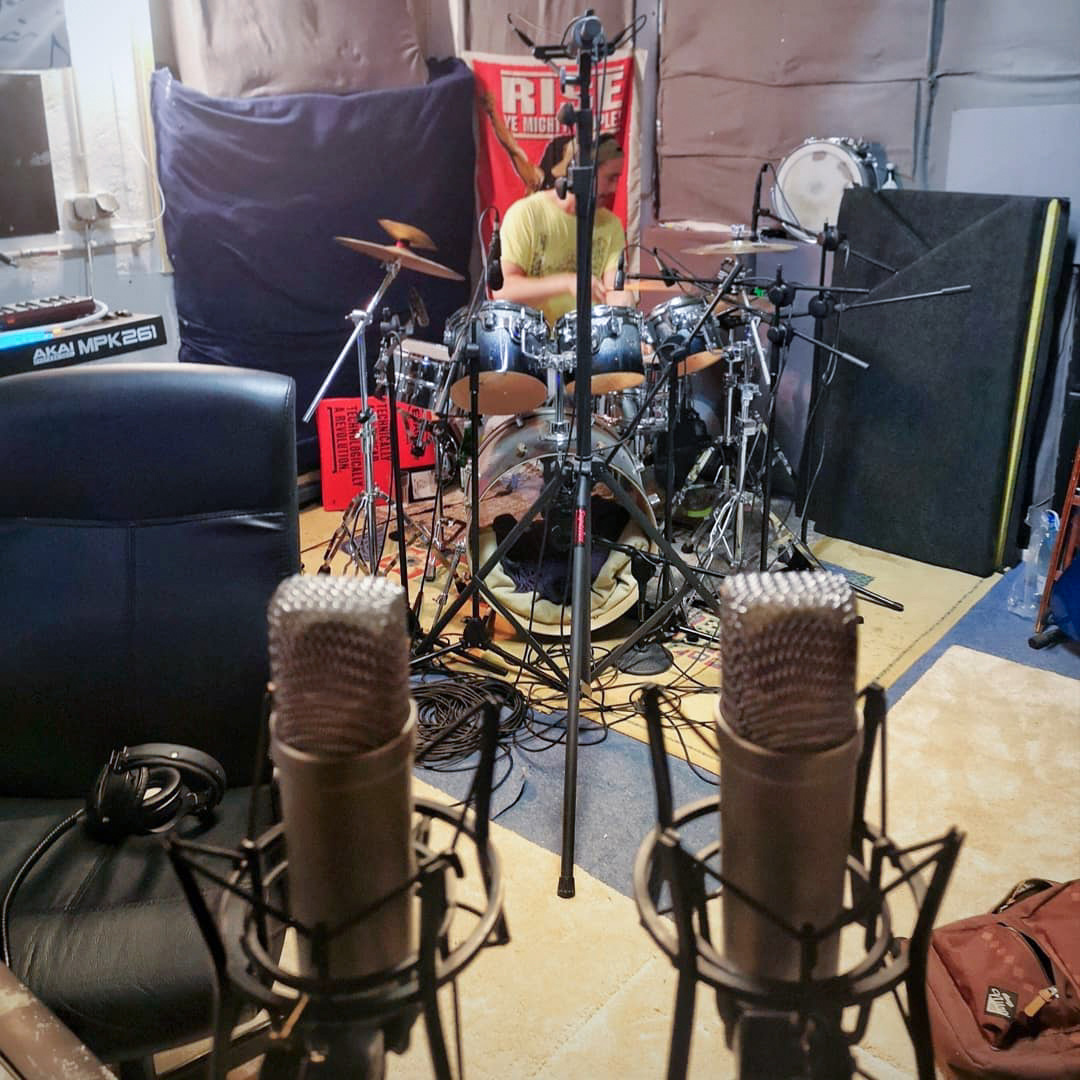
You can choose the distance depending on how much "natural reverb" you want. If the room microphones are very far away, the reverberation time will naturally be longer. Placing them closer will pick up more direct sound and shorten the reverberation time.
Step 2: Connect microphones and record in the DAW
When you have everything set up, you plug everything into the interface and remember where everything goes. Because then you have to create as many tracks in your DAW as you have microphones set up.
You then group these tracks, name them according to the individual drums (kick, snare, hihat, etc.), and assign them to the appropriate input channel on your interface. You do this by selecting the appropriate audio input for each track, usually in the track of the DAW itself (see image below).
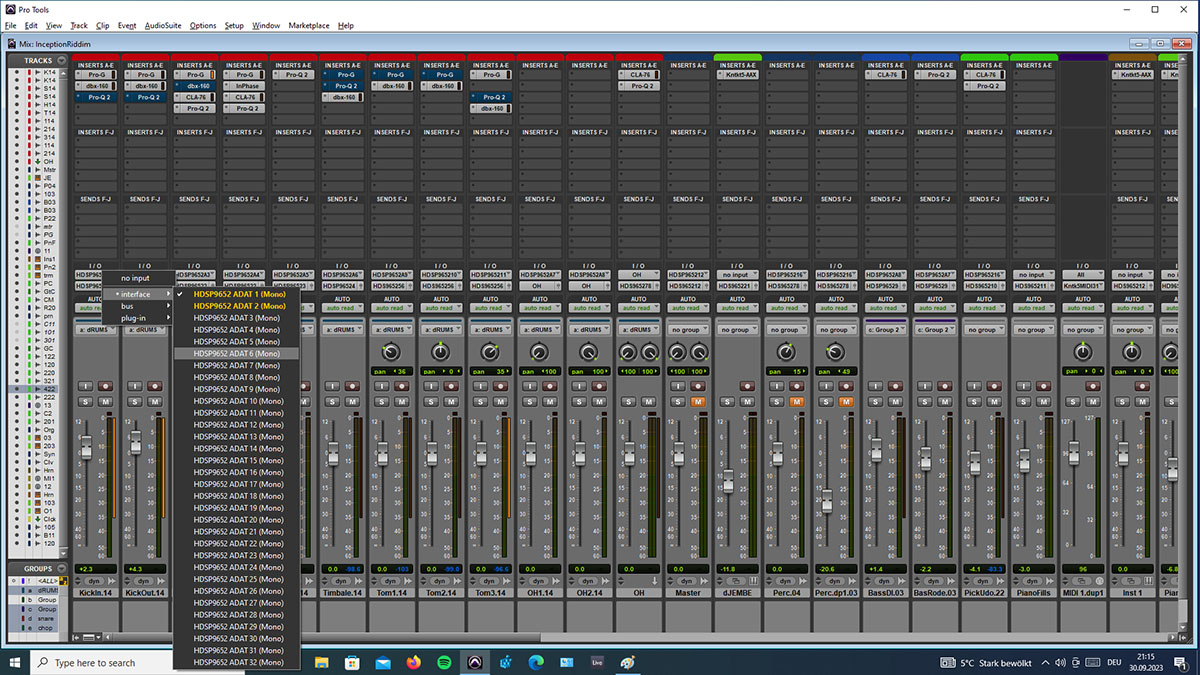
After that, you can actually start recording right away - since you grouped the tracks, all tracks will be recorded simultaneously and synchronously.
You will probably need to make several takes. To organize them and make editing easier, I recommend working with playlists (that's what they're called in Pro Tools). This allows you to do several takes in a row on the same track without having to create new tracks. In Ableton, they are called "take lanes" - and the generic term for this technique is "comping.
Should I record on a click track (metronome) or not?
My answer is very clear: Yes, you should. Recording to a click track opens up a lot of possibilities because the tempo stays the same throughout the song. For example, you can copy a few bars of drums from the beginning of the song and paste them at the end if the drummer made a mistake.
This is not to say that recording without clicks is bad - no, you can get great results without clicks. But you just don't have all the options later on - not to mention the fact that very few drummers are able to keep a constant tempo throughout a song without a click track. So you'll have tempo fluctuations in the song, and that doesn't sound very professional.
Many people claim that a metronome is a mood killer - that's simply because you don't practice enough with it. I have been working with a drummer for a long time who has been playing with a click for over 10 years - both in rehearsals and concerts. He says he doesn't hear the click at all when he plays - so he still feels very free with click. But it wasn't like that in the beginning - it took him a few months to be able to play with click at all.
Practice with a click track is essential for every drummer. It pays off in the long run and earns appreciation from sound engineers and producers.
Monitoring during recording
If your studio consists of two rooms - one for recording and one for mixing - you can monitor the performance while recording using your studio monitors. However, if you have only one room, it's recommended that you turn off the monitors and listen solely through headphones to prevent sound from bleeding into the drum mics.
The drummer should definitely have headphones so he can hear the music/click track and himself. It is best to make two separate monitoring mixes, one for you and one for the drummer. For the drummer's mix, turn up the drum mics a bit louder than yours, as well as the click - you don't really need it as a sound engineer. And of course, always ask the drummer if everything is okay and if he is happy with his monitor mix.
If you don't have the ability to do two separate monitor mixes, just do a drummer mix and that's what you'll get. The most important thing is that the drummer is 100% satisfied so that he can perform as well as possible.
You should also do a rough drum mix while the drummer is warming up - it doesn't have to be perfect, but it should sound as natural as possible. Mix the overheads left and right, bass drum, snare and hihat at about the same volume so that the basic beat sounds stable and balanced. Make sure the toms are not too loud.
The goal of this rough mix is for the drummer to hear himself well and for you to hear if there are any fundamental recording problems.
It is also very helpful to have some other accompanying instruments such as guitar, piano or vocals already in the track (just a rough recording, not the final one) so that the drummer can hear the flow directly and insert the appropriate breaks, fills and groove changes in the right places.
Next steps
If you've finished recording, congratulations! Recording drums is one of the most tedious tasks a sound engineer has to perform. But you're not done yet: now comes the mixing of the drum tracks, another very exciting task. Check out my comprehensive mixing guide for the next steps to get the most out of any drum recording.
Here are some more detailed instructions for home studio recording:


