Want to learn how to mix music? Then there is one thing I should (unfortunately) warn you about: there are no magic formulas or rules. Mixing is an art mastered by sound engineers and music producers, but it is always individualized for each song.
There are no rules to mixing, but there are techniques that are often used by many producers because the resulting output is considered pleasing to the majority of people.
These are the mixing techniques that this article is about. I learned many of these concepts during my education as an audio engineer - but much of it has been self-taught over the course of my career.
What is Audio Mixing?
Audio mixing is the penultimate process in music production, taking place after recording and before mastering. Audio mixing involves processing the recorded audio tracks, adding effects such as compression, EQ, reverb, delay, or modulation, and mixing them into a single stereo file.
The goal is to create a sonically balanced song. For example, the bass should not be too loud or it will overpower everything else, but not too quiet or it will lack punch and the song will sound weak.
The different tracks are also distributed across the stereo image, for example, the hi-hat can be placed on the left side (left panning) and the guitar on the right side (right panning). Certain elements are often placed on the sides, but others, such as the bass, are always in the middle. More on this later!
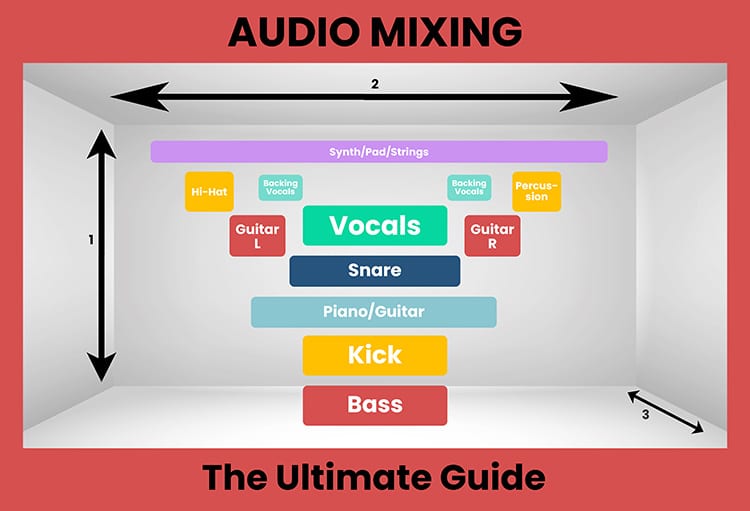
The way I see it, a song is flat before mixing and everything is on the same level. My goal in mixing music is always to create a three-dimensional stereo image, as if the instruments were standing in a concert hall.

Why three-dimensional? In audio mixing, as in geometry, there are 3 dimensions. To better visualize this, it helps to imagine all the instruments of the song on a live stage:

- Height: This axis describes where the instruments are located in the frequency range, i.e. which instrument is above or below another instrument. High instruments are at the top of the stereo image, while low instruments are at the bottom. You can control this with the EQ.
- Wide: This dimension describes whether the instruments sound to the right or to the left. With panning, you can position the different audio tracks to the left or right of the stereo center to create a wide soundstage. If I leave everything in the middle and don't pan, I get a mono song instead of a stereo one.
- Depth: This axis describes whether an element is in front of or behind another element in the mix, and is primarily affected by reverb and delay effects. If I add more reverb to an audio track, it sounds farther away from me. But if I have a track with no reverb at all, it sounds like it is right in front of me.
The art of mixing lies in being clever and using the different dimensions to your advantage.
A practical example that I have experienced several times: I have a song with a singer and a solo guitarist, both playing at the same time. Both are main elements, so I want them both in the stereo centre.
They also play/sing in about the same frequency range, so they don't differ in pitch, at least not very much.

However, I notice that the two collide and should be separated in the stereo image - what options do I have?
The depth processing! I add reverb to the guitar track to make it sound distant, while keeping the vocal track pretty dry to make it sound "in-your-face". This is a good way to separate the two tracks so they don't collide.

Now I would like to explain my mixing method that I have developed over the years. I always go through certain steps to bring structure to my mixing process.

By loading the video, you accept YouTube's privacy policy.
Learn more
0. Before mixing: Ear training
Always listen to your reference songs through your speakers/headphones first.
I can't stress this enough! This is a step that is so often neglected, but can save you a tremendous amount of time.
You need to know your monitoring system (i.e. your studio monitors or headphones) very well. To do this, you need to know how professionally produced songs sound through your monitoring system.
I've seen engineers do amazing mixes over relatively cheap monitors because they knew exactly how the songs should sound over those monitors.
This means that even if your monitoring system is not 100% linear (which will be the case for most, since a perfectly acoustically optimized room can be very, very expensive), this is not a bad thing. But you need to know which frequencies in your room are being emphasized and which are sounding weaker than they should.
Otherwise, you will overcompensate, and your mixes will not transfer well to other monitor systems.
That's why I always listen to some of my reference songs (or if the client sends reference songs, I listen to those too) for about 20 minutes before I start mixing.
This helps me get an idea of the direction the song should go and how the elements of the song relate to each other.
And I always repeat this process between long mixing sessions. It's kind of a break (which you should do anyway) that helps me stay on track.
1. Choose your DAW
You've probably already chosen your DAW - if not, make sure you check out our ultimate DAW comparison. There I compare the 12 most popular DAWs on the market.
At the end of the day, it doesn't really matter which DAW you mix with - you just need to be reasonably proficient and familiar with it. Otherwise, technical difficulties can interrupt your creative mixing workflow and distract you - and we don't want that.

Personally, I've always preferred Pro Tools for mixing (and recording) - but that's also because I always had to work with Pro Tools in my degree as an audio engineer, and it's become established for me. There are also cheaper and more straightforward alternatives that work just as well, like Ableton Live or Logic Pro.
2. Preparing/Organizing the project
Organization is key to the mixing process. Especially when you're working on multi-track projects - without proper organization, it can quickly become a huge mess where you don't know which instrument is on which track.
I'm speaking from experience, of course. In the beginning, I made the mistake of not naming the tracks properly, and ended up with projects with 40 tracks called Audio1_dup_1 to Audio1_dup_40.
And if you want to change something on the guitar, it takes you 5 minutes to find out which track the guitar is in!
Tip: Always start with good takes
In 99% of cases, if you realize during the mixing process that you don't like something in the recording, it's worth re-recording the performance.

Often people tend to be lazy and say: I'll fix it later when I mix. No! Do yourself a favor and record it again - it's usually the better way.
If the singer sings much louder in the first verse of the song than in the second, and you try to compensate with a compressor, the two verses will sound very different.
In the first verse, the compressor has to work much harder. This makes the voice sound more compressed and less dynamic than in the second verse. This sounds unnatural to the listener.
So: it's better to record the first verse again and try to get the singer to sing with the same volume and energy as in the second verse.
Import and name the tracks
It is essential that you name all of your tracks correctly, so that you always know which instrument is on which track. This is extremely important to ensure that your creative workflow and concentration are not interrupted.
Personally, I always choose the same names and placement for the tracks in each mixing project. That way, I always know that my kick is on the far left (the 1st track) and my vocals are at the very end (the last track), so I can quickly access those two important tracks.
Color and group your tracks

I always color the tracks sorted by groups of instruments when mixing. This is also particularly useful for exporting stems after the mix.
- Blue for all drums and percussion tracks such as kick, snare, hi hat, tom, cowbell, tambourine, etc. I use dark blue for drum tracks and light blue for percussion. That way I know they belong to the same group, but I can also quickly tell them apart.
- Red for all guitar tracks. For example: dark red for the lead guitar and light red for the rhythm guitar.
- Yellow for the bass. For example, if I still have a synthesizer to complement the bass, then it will be colored in a different shade of yellow.
- Light green for the lead vocals and dark green for the backing vocals.
- Orange for the piano.
- Lila for the organ.
This is just an example to illustrate how I do it in certain cases.
3. General balance
The first thing I always do is set all the tracks to about the same volume to create an overall balance.
That way I can get a feel for what's right and what's wrong; what needs to be emphasized and what needs to be corrected. I get a general idea of what needs to be done on the song.
This is an important step because the ability to make neutral judgments diminishes over time as you work on a mix. That's why first impressions are so important.

During my first mixing sessions, I always had a piece of paper with me to jot down ideas at this stage so that I wouldn't forget them later. I can recommend this to anyone just starting out in mixing.
If you produced and recorded the song yourself, you can probably skip this step because you already have a rough mix (that's what you call an unfinished mix where the volume ratios are about right) and an idea of the song.
4. Editing (sound shaping) of individual tracks
After I have a general balance and a rough mix, I go through each track that needs to be changed and edit it. The idea is to get each track to sound the way I want it to sound and to correct mistakes and problems without really mixing much.
I usually listen to the track together with everyone else - but also solo in between when I want to make certain changes to the sound.
When working on a single track, it is important to keep the big picture in mind (or rather, in your ear). Therefore, it is advisable not to listen to the track alone for too long - because the listener will never hear it alone anyway.

After all, what good is a really good bass drum with a rich low end if it sounds great on its own but masks everything else in the mix?
So: Editing tracks solo while mixing is fine, as long as you listen to all the other tracks together in between to assess how the editing of your track affects the overall mix.
Now I'm going to try to describe my general approach to editing tracks - although I struggle with it a bit. The reason is that every song is really unique and always needs different settings, so there are no rules or tips that can be applied to all songs.
But there are procedures and situations that happen quite often, that I've seen over and over again in my career, and that's what my recommendations are based on. But again, these are not rules. Your song requires settings that only you can know.
Vocal Mixing
My first plugin in the vocal chain is usually a shelf EQ, which reduces frequencies around 200Hz for male singers - or 400Hz for female singers.
If there is noise or other unwanted sounds in the recording, they are either cut manually or removed with a noise gate - in this case, the noise gate comes before the EQ.

This gives the voice more clarity and assertiveness in the mix and compensates for the proximity effect that is always present, to some degree, when you sing in front of a microphone.
To do this, I always add a high-pass filter that removes all frequencies below about 100Hz - nothing from the voice should be audible there anyway, just possible noise or hum from the electronics.

The next "corrective action" is usually a de-esser to remove the sibilants ("S" and "Sh").
First, it makes sure that those annoying noises go away, and second, it makes sure that they don't affect my compressor, which is next in the chain.

This gives me clean, clear and crisp vocals for the moment.
My next step is usually compression. Depending on the singer, more or less compression is needed here.
I've often taken weak, low-energy performances - especially hip-hop vocals when the rapper is in the studio for the first time - and turned them into really great, vibrant vocals, and it's all thanks to compression.
A compressor balances the loudest and quietest peaks and affects transients. This can have advantages and disadvantages. Here are a few examples:
- If the vocals get a little too loud or too soft in between and you find this annoying, you can use a compressor to even out the volume differences.
- If the singer has little energy when singing (and if he can't do any better, because re-recording is always a better solution), you can use a compressor with a medium attack and a fast release to make the vocals sound more lively and energetic. This technique is often used in hip-hop.

I also always recommend splitting the compression into at least 2 phases (i.e. 2 compressors). In today's digital age, where everyone has a lot of plugins, 2 compressors should not be a problem.

This way, the compression effect is less audible and more natural, because each individual compressor has to work less than if it had to do all the compression on its own.
If you want to learn more about vocal mixing, I recommend my article on the perfect vocal chain.
Drum Mixing
If you have recorded real drums, it is important to work with good recordings. If the drums are sampled, a good sample selection is the most important thing.
The drum sound is usually very genre-specific, but everyone always wants tight drums that carry the beat of the song throughout.
To do this, the kick drum and the snare are usually compressed a lot so that the two instruments are at the same level. Usually these two instruments don't play at the same time, so you can say that you should try to bring them to the same perceived volume.

My VST favorite among drum compressors is the DBX-160 from Waves, which emulates the classic DBX-160A hardware model.
The sound is brilliant for drums, and it comes with several kick and snare presets that are good starting points for tweaking.
Basically, you need a slow attack and a fast release to give the kick and snare their characteristic punch.

Don't be afraid to give it a good amount of compression if you can - kick and snare are usually meant to sound very tight, and you can do that very well with this compressor.
I also do a lot of compression on the toms so they all sound pretty even. I usually use the DBX or the CLA-76. The settings are similar to the snare - medium to slow attack and fast release.
The hi-hat is always different, but I usually use a high-pass filter to filter out everything below about 7 kHz.

But it varies a lot - it depends on whether I'm working with samples or a real hi-hat.
The overhead and room microphones of the drums are usually compressed and only minimally added to the mix. However, if you want a more live-like sound, you can turn up the volume on these tracks.
Parallel compression
I usually route all the drum tracks to a new stereo track in the mix and use parallel compression.
For hard genres like rock or heavy metal, parallel compression is used with extreme settings to make the drums really rock. This is done by lowering the threshold considerably and selecting a very high ratio (e.g. 10:1).

If the drums sound extremely squashed and over-compressed, you can start by turning down the compressed stereo track or the dry-wet control a bit to hear more of the natural drums until it sounds right.
You can use this technique on drums in any genre if you want them to really pop.
Backing vocals mixing (adlibs, doubling for hooks, etc.)
Backing vocals are also an important part of any mix - whether it's three-part harmonies on pop vocals or stereo doubling on the hook of a rap song.
Backing vocals are usually compressed more than lead vocals, so they sound further back (because they have less dynamics). They should always sound behind the lead vocals.
If the compression isn't enough for that, I often add a slight flanger effect to really push the vocals into the background.

I also make the backing vocals wide so they don't clash with the lead vocals, which are always centered.
I also like to use pitch correction, such as Auto-Tune, on backing vocals. Since they tend to be in the background, you can apply more pitch correction without it being very noticeable. This is especially useful when the backing vocals harmonize with the main vocals, as it gives a sense of perfection.
Bass Mixing
When I say "bass", I mean both real basses and synth basses.
The bass is usually a complicated instrument because the low frequencies are difficult to control. It is crucial that the bass does not collide with the kick drum, or the low end of your song will quickly become oversaturated.
You can either EQ the bass and kick differently or use sidechain compression.
Sidechain compression is used to compress the level of an audio track, but only when receiving an input signal from an external source (another audio track).

So you put a sidechain compressor on the bass track and select the kick drum as the sidechain input. That way, when the kick drum hits, the bass goes down and they don't collide.
I always prefer to mix this way, because I don't have to use the EQ and change the sound of the instruments.
Then I usually add a normal compressor with relatively soft settings. This gives me a little more control over the volume and levels.
And if the bass still lacks punch, I let the compressor work a bit more, with a similar setting to the drums.
Saturation or overdrive also helps the bass, especially in making it audible on smaller speakers like cell phones. It also cuts through the mix better.

Keep reading: EQing and compression of the sub-bass for a clean mix
Other elements (guitar, piano, strings, etc)
For the remaining elements, it is difficult to make a general recommendation because, on the one hand, the exact choice of instrument is different for everyone and, on the other hand, the settings of these instruments are sometimes so different that it is difficult to generalize.
Most of the time, however, these rhythm instruments are used to create a wide stereo image.
In rock/heavy music, guitars are almost always double-tracked, with one track on the left and one on the right, to create a cool stereo effect.
Pianos are also often spread across the stereo image, trying to have the low notes on one side and the high notes on the other, just like real pianos.
Strings and pads also tend to be spread out broadly across the stereo image by briefly delaying the phase of the wave on one side - don't worry, many plugins do this for you, such as the Slate Digital Murda Melodies, my favorite stereo-widening plugin.

So try to build a solid harmonic foundation with such rhythm instruments that can complement the beat of the drums + bass well and form the basic framework for the vocals to be sung on.
5. Corrections to individual tracks, but affecting the entire mix
Now that I have made the major corrections to each track and my sound design is complete, the actual mixing begins.
At this stage, I think about the following:
- How do the audio tracks interact with each other in the mix?
- Where do tracks conflict with each other?
- What needs to be highlighted in the mix?
- What is missing? Where are there gaps in the mix?
- Where should each element be located in the stereo image?
Mixing with EQ for colliding frequencies
Let's say we have a guitar track and a piano track where both instruments play in similar frequency ranges. It sounds muddy and unclear in that range, and you want to separate the two instruments.
Use EQs to do this: You should find a frequency range on one of the two tracks that sounds particularly good in this song and emphasize it a bit. Then use the EQ to cut the exact same frequency range on the other track to make room for the other track.

You could now repeat this process in reverse, creating a "gap" in the first track in a different frequency range, and then emphasizing the other track in that range.
But you should be careful and always listen carefully when you EQ too much, because too much EQ can lead to an unnatural sound and phase problems.
Panning for width in the mix
In this phase, I determine where each instrument will be placed in the stereo image. There are a few rules that apply 99% of the time:
- The vocals have to be in the center
- The kick drum must be in the center
- The bass must be in the center
The snare is also usually centered, but this is not always the case. All the other instruments are distributed around the stereo panorama. I always try to have the same number of instruments on the left side as on the right side, so that both sides are more or less equally loud.

When panning, it is always important to leave enough room in the middle for the vocals. This also applies to any other instruments in the middle - there should not be too many other than the kick, bass and snare.
But if, for example, you have a very important mono synthesizer in the song that you don't want on the left or the right because it plays an important supporting role, then use a stereo widening plugin and make it wide. That leaves space in the middle for the vocals.
Compression + automation to keep the dynamics in the mix under control
As you listen to all of the tracks, you may notice that every now and then something gets a little too loud or a little too quiet.
The guitarist might have played a bit too loud in the chorus, for example, or the drummer played the first 2 bars too softly because he was still unsure.
There are 2 possible solutions:
Compression
You can simply compress the track to compensate for the differences in dynamics. The advantage of this method is that it is relatively easy and quick to do. The disadvantage is that the sound of the instrument/voice is changed by the compressor, it sounds more squashed.
Automation
If you work with automation instead, the original sound of the track remains unchanged, and you still have control over the quiet and loud parts.

The advantage of this method is that you have 100% control over what exactly happens to the dynamics (with a compressor you don't have this control, the compressor reacts differently to each word/sound).
In addition, as mentioned above, the sound of the instrument or voice remains unchanged and does not sound squashed as with a compressor.
The disadvantage of this method is that it is very time consuming. You have to edit every part manually, it's very tedious. So you don't always have the time or the client doesn't have the budget to automate everything manually, which is why many producers resort to the compressor.
Reverb for 3D/depth in the mix
Now it's time for reverb. This is one of the most important effects for creating the depth that everyone expects from certain instruments. What would Travis Scott's adlibs be without his massive reverb?
There are no rules for mixing, not even for reverb. But what I can tell you is that as a beginner, you tend to put way too much reverb on the tracks. When I listen to my mixes from the beginning of my career, that's what I notice the most, and it bothers me a lot.

The reverb should be there, but so little that you don't really notice it. Only when you mute the reverb track should you notice that the reverb was there before - if that's the case, then you've done everything right.
I'm just saying that you have to be very careful with reverb or you'll end up with a big muddy mess where everything sounds blurry because it's all covered in reverb.
As a rule of thumb, leave low-frequency instruments (such as kick or bass) without reverb, and apply reverb only to instruments that play in the mid and high frequencies.
Lots of reverb makes the instrument sound far away. Less reverb makes the instrument sound like it is right in front of you. Depending on what you are trying to achieve, you should consider how much reverb is needed on the track:
- Do I want the singer to sound like he is at a live concert in a football stadium? Then I definitely need a lot of reverb for my vocals.
- Or do I have a love song full of emotion and want the vocals to sound like they are whispering in your ear? Then I'd better use no or very little reverb.
For vocals, it's worth taking a look at the reverb's pre-delay settings - this is a good way to separate the main vocals from the reverb and make the effect a bit more subtle.
Delay for depth in the mix
Delay is a creative effect that can be used in many ways. In general, it can be said that delay also adds depth to the sound.
Similar to reverb, tracks with delay will sound further away than if they had no delay effect.

Fast delays (e.g. slapback delay) sound like a spring reverb, while long delays sound like you're screaming in the Grand Canyon and listening to the echoes.
Delays are good for filling vocal gaps. If the singer has a pause in the part, it can be cool to repeat the last words with a delay and let it sound in the pause.
And stereo delays with slightly different delay times on the left and right make your track wider - a little of that can be pretty cool for vocals.
Phaser/Flanger for experimental effects
Phasers and flangers can also be pretty cool if you use them from time to time. You can use them on guitars, pianos, synthesizers, theremin or even vocals to create more experimental sounds.
You have to be very careful, though, because things can get weird and strange very quickly. So always listen carefully to what is happening.
I like to use the flanger sometimes on female backing vocals - I think they sound very good when you add a little bit of it.

And I like to use the phaser on guitars when I want them to sound a little alien.
6. Mixing - Final Balance
Now comes the phase where I try to work exclusively with the faders and not make any changes to the effects settings.
I now have all the tracks the way I want them, so all I have to do is refine and balance the volumes.
This is probably the most difficult process and the one that requires the most concentration. You really have to listen carefully to everything that goes on in your song.
Often it makes sense to create groups from different tracks (e.g. if you have 12 drum tracks, such as kick, snare, hi-hat, etc.). You can create groups of drums, lead vocals + backing vocals, piano + piano, etc. wherever it makes sense.

That way, later on, you only have to mix the groups together, and later on, you only have to work with 5 or 6 faders instead of 40.
I usually start with the drums. The drum tracks are mixed together and then grouped.
Then I add my bass and balance the two instruments. In the end, there has to be a solid foundation on which everything else can play well.
Then I add all my other rhythm instruments and mix it all together to make an instrumental - no singing.
Then I bring in the lead vocals and the backing vocals. And if there's a solo on an instrument somewhere, that comes in as well.
In the best case, I don't have to go back a step and my mix is done, but that's rarely the case. In the end, you always have to go back and change something until you are 100% satisfied.
Bonus: Creative automation
Now that the mix is complete and I've tested it on a variety of studio monitors, there's one last thing that can be done to take the production to the next level.
Creative automation. This is what I call automation, whose purpose is not to correct mistakes (as mentioned), but to emphasize important parts of the vocal (or instrument solo).
A practical example: If the vocals have a emotional peak in the bridge of the song before the resolution to the verse, and the vocals are particularly beautiful there, I would use the automation to boost the vocals by max. +1dB to create a kind of crescendo.

Or if I want to emphasize the very last chorus of the song, I can use automation to make my backing vocals louder here - so that this chorus immediately sounds different and more powerful than the others.
In Conclusion
My recommendations are not rules or magic formulas that work everywhere - these are techniques I have used many times in my career because certain patterns, mistakes, and particularities repeat over and over.
Ultimately, you have to develop your own method of mixing the best and most efficient way. And that takes a lot of practice!