What is a noise gate?
A noise gate, also called an expander, is a device in audio signal processing that allows a signal to pass only if it exceeds a certain threshold. Essentially, it is a form of dynamic range compression that reduces the volume or even completely eliminates an audio signal below a certain threshold.
Noise gates are commonly used in music production, live sound reinforcement, and broadcast applications to suppress unwanted background noise and improve overall sound quality. They are particularly useful for reducing unwanted noises such as hum, hiss, and buzz, which are especially audible when the singer/speaker pauses.
As a practical example, you record yourself singing at home with a microphone, and because your room is not completely isolated from the outside world, you can hear traffic on the street in the background. This background noise is not very loud, and when you sing, it is masked by your singing and is not audible. But you can hear it during breaks.
Now you have two options: You can cut every single break, which is a lot of work, or you can use a noise gate. It turns on when you stop singing and suppresses traffic noise, hissing, humming, and the like.
How does a noise gate work?
Noise gates are basically compressors that work from a certain threshold, only in reverse. They start working when the signal falls below a certain volume and then reduce the volume by a certain ratio. This ratio often goes to infinity, i.e. the signal is completely suppressed.
While singing or playing, the signal level should be above the adjustable threshold. As soon as you stop playing or singing, the signal level will drop below the set threshold.

At this point, the Noise Gate kicks in and suppresses the entire signal, which at this point is just noise. As soon as the vocalist starts singing again, the noise gate stops working. However, the audio signal will be so much louder than the noise that it will no longer be noticeable.
A noise gate cannot remove all background noise
With a noise gate, you can only remove the noise in the pauses, not the noise in the singing or playing. If the noise is loud enough to be heard during the performance, it is better to re-record, and if that is not possible, work with specialized audio repair software such as iZotope RX. These may be able to fix the problem, but it is always best to re-record.
Parameters of a noise gate
Most noise gate plugins have similar parameters. Hardware noise gates usually have fewer features, because e.g. the lookahead can only be done digitally.

- 1. Threshold: Sets the input level at which the gate opens and closes.
- 2. Ratio: Specifies the amount of gain reduction that occurs when the signal falls below the threshold. With a ratio of 3:1, each dB below the threshold results in a -3 dB reduction.
- 3. Range: Specifies the maximum amount of noise reduction that can be applied to the signal.
- 4. Attack: Determines how fast the gate opens when the signal is above the threshold.
- 5. Release: Determines how quickly the gate closes when the signal falls below the threshold.
- 6. Lookahead: Allows the noise gate to analyze the incoming signal before it reaches the gate for more precise and seamless control.
- 7. Knee: Determines whether the noise gate opens and closes slowly (soft knee) or abruptly (hard knee) as the signal approaches the threshold.Q
- 8. Hold: Specifies the amount of time the gate remains open after the signal falls below the threshold to prevent the sustain or decay of the audio from being cut off.
How to get the most out of your noise gate
1. Insert a Noise Gate as the first insert plugin
First, place the Noise Gate plugin in an insert slot on the track where you want to reduce noise. It should be the very first plugin in the chain, otherwise other effects will reduce its effectiveness.
For example, using a compressor in front of the noise gate reduces the level difference between the signal and the noise, because the noise gets louder as the signal is compressed. This makes adjusting the noise gate much more difficult and inaccurate.
2. Activate lookahead
If the VST plugin offers the option, be sure to enable Lookahead. This gives the plugin a "look into the future" and allows it to open the noise gate just before the signal starts to ensure that the initial level is not cut off.
I also always choose the maximum lookahead time to make sure nothing is missing.
3. Set the threshold
This is probably the most important step of all. The threshold should be set just above the noise and as far below the actual signal as possible. This ensures that the quieter parts of the performance are not cut off (e.g. with vocals, the beginning and end of a movement are often slightly quieter).

Most plugins offer a visual aid to help you distinguish the noise from the signal. It is always better to double-check that the noise gate is not removing quiet parts of the signal that you actually want.
4. Set attack
The Attack parameter determines how long it takes for the gate to open when the signal rises above the threshold. If you want to preserve the natural sound of the audio track, you should always use very fast attacks, in most cases even 0.
Slower attack times cut off the initial transients, which can sometimes be desirable, but in most cases is not - it results in an unnatural sound.
5. Set release
The next step is to set the release time, which is the time it takes for the Noise Gate to close at the end of the performance. You should always start with long release times, so that the last syllables or notes are not cut off, and then slowly reduce the release times until you are satisfied.
Care should always be taken not to lose the final accents of the performance, as they often contain important information that, if missing, will result in an unnatural sound. For example, the last breath or air on "t" or "s" in a vocal performance.
So remember: Always listen carefully to what's happening throughout the track, don't just set it once and forget it.
6. Set hold
This step is optional, but the Hold parameter can be used to fine-tune the rate at which the Noise Gate closes. For example, if the last parts of the performance are cut off even with a long Release time, you can use a longer Hold time to bring those parts back. Hold works like a pre-release.
7. Determine ratio and range
The next step is to decide how much to reduce the background noise. High ratios such as 100:1 or ∞:1 should be selected if complete noise reduction is desired. If all other parameters are set correctly, a natural sound should be maintained.
However, if the audio track is difficult or you simply don't want to remove all the noise, you can select lower ratios, from 4:1 to 50:1. The Range parameter can be used to set an absolute limit for the level reduction.
8. Extras
Most noise gates have a few extras like sidechain and filters that can be helpful in some situations:
With the high-pass filter or a low-pass filter, you can tell the Noise Gate to ignore certain frequencies so that it won't open. For example, you might put a noise gate on the kick track to suppress snare bleed. Then you set the low-pass filters in the noise gate so that snare hits don't open the gate at all, and it only opens on a kick hit.

The sidechain control lets you set the Noise Gate to open only when another track crosses the threshold. For example, the bass drum in your production needs more bass. Record a bass synthesizer with a long note and place it under the bass drum. Place a noise gate with the kick drum as a sidechain input on top of the bass synth. This way, the synthesizer starts and stops in sync with the kick and overlays perfectly.
Practical application examples for a noise gate
Reduction of background noise in vocal recordings
When recording vocals with microphones, there is always some noise because you have to give the preamp a lot of gain. This amplifies the inherent noise of the microphone, but with a well adjusted noise gate (as described above) this noise can be well suppressed.
The same applies to recording all other instruments with a microphone, but the instruments are usually so loud that the noise is not audible because less amplification is needed.
Transient processing
A noise gate allows you to manipulate the dynamics/transients of the audio track, similar to a compressor. For example, the snare drum's reverberation can be extremely shortened, as you can hear here:
In the context of the whole drum kit this makes a big difference - the snare sounds much more punchy and direct.
To do this, simply set the release time as short as you want the reverb to be. This way, the gate closes before the snare reverberation ends, effectively shortening the release time. Very useful for recording real drums that do not have ADSR control.
The same technique can be used to remove the reverb from a sample - actually only the reverb in the pauses, but that is what you are most likely to hear.
Bleeding reduction for drum recordings
Bleeding is the sound that comes into the microphone from instruments other than the one being recorded. This is normal for drum recordings because the microphones and the drums are very close to each other, so you always hear the hi-hat on the snare mic, for example. Usually this is fine and you can still mix the drums well.
But if I want to give the snare a lot of reverb or compression, I don't want the hi-hat to be heard over that track, because it will get the effects as well. You can use a noise gate that opens before the snare hit and closes before the next hi-hat hit.
This way the snare is "isolated" and only it receives the compression or reverb - this makes it all the more important to use the Noise Gate as the very first plugin in the effects chain.
Noise reduction for electric guitars
When you record a distorted electric guitar with a microphone through a guitar amp, the distortion creates an audible noise. This noise is quiet compared to the guitar and is masked during playing, but can be very annoying during pauses. Finger noise is also greatly amplified by the compression of the distortion and can degrade the quality of the recording.
These noises can be removed with a noise gate as long as they do not occur during playing. Fret and slide noises, for example, often occur before the riff starts, as you move your fingers to find the right position, so they are easy to remove.
Gated Reverb on Drums
This effect was very popular in the 80's and is nothing more than a reverb with a noise gate behind it. The reverb is usually used with long reverberation times that are abruptly cut off by the noise gate after a certain amount of time, resulting in an unnatural but very exciting effect.

By loading the video, you accept YouTube's privacy policy.
Learn more
The sound is very different from when the reverb fades out naturally, and it creates an explosive effect that can be interesting for rock, pop, or even heavy metal.
The best noise gate plugins
All DAWs now have good noise gates as standard plugins, which should be sufficient in most cases. However, if you have a little more money to spend, there are some interesting plugins that can offer some additional features.
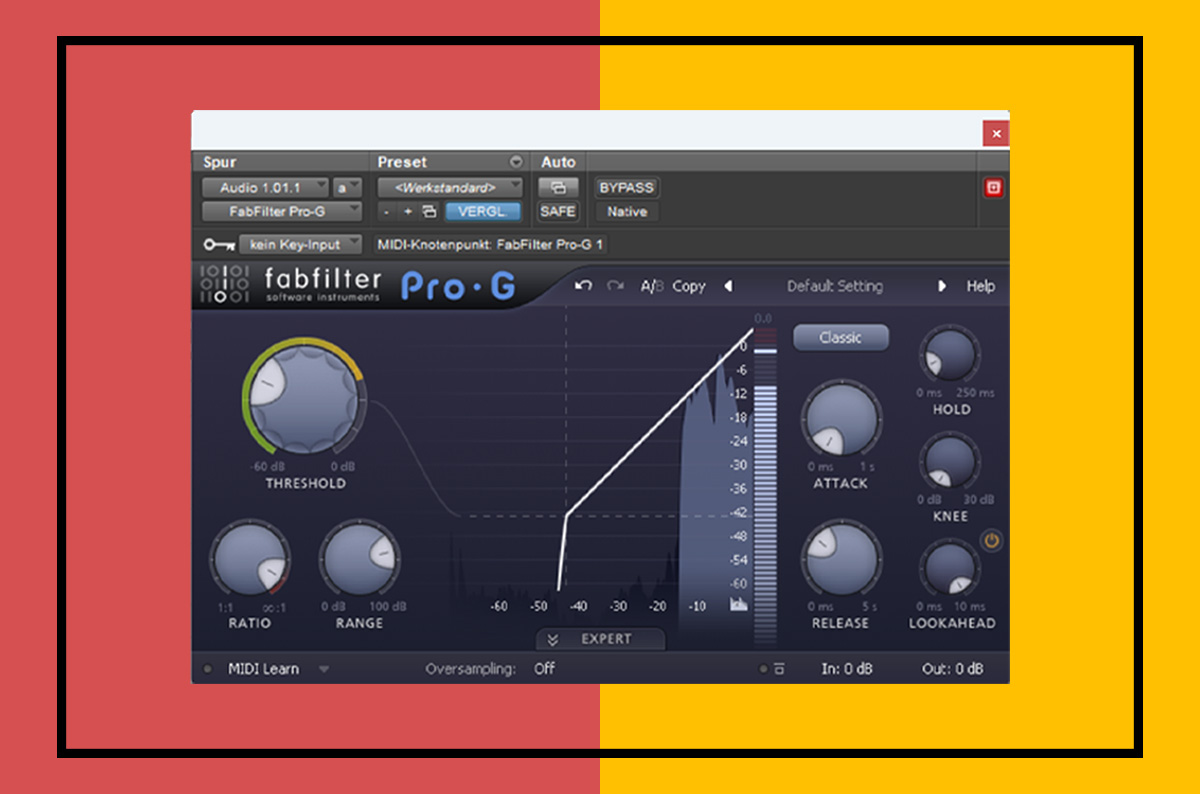
- Fabfilter Pro-G: In my opinion, this is the best noise gate plugin ever. It has all kinds of functions like sidechain or filter and works extremely precise.
- Waves C1 Compressor: An affordable compressor/expander from Waves that doubles as a noise gate and offers many additional features.
- SSL X-Gate: A very high quality noise gate from SSL with a very nice visualizer and many features.